Filter by Multicast / Broadcast in Wireshark

When tracking down multicast and broadcast sources it is useful to be able to filter everything to leave only the multicast and broadcast traffic.

To do this in the wireshark GUI enter this into your filter and click apply.

(eth.dst[0] & 1)

It is also worth noting that at the bottom of the screen it displays the total number of packets captured and the number displayed.  This is a nice quick way of seeing just what percentage of your packets are multi/broadcast to this server or span port vs the rest of your traffic.

Configure sendmail to relay via smarthost

Sendmail appears to be falling out of favour to other MTAs such as postfix but I often find myself using it because it tends to be available on every distribution and is still widely used.  Problems or security issues are usually quickly patched.  Sendmail is definately one of the harder MTAs to configure so if you are looking to do more than basic relaying you might be better of learning how to configure postfix instead.

Assuming you have sendmail pre-installed or installed via:

apt-get install sendmail

or

yum install sendmail  (you might also need to install m4 to build the configurations)

Make sure your sendmail host can resolve and reach your smarthost relay, if required add an entry to your hosts file or setup your resolv file.

vi /etc/hosts

Now edit the sendmail.mc file in your favorite text editor:

vi /etc/mail/sendmail.mc

As here we are only setting up a single smart host just add the line:

define(`SMART_HOST’, `server.fqdn’)

Where server.fqdn matches the entry in DNS or your host file.  Make sure you use the exact format above, it might help to copy and paste this into your config file via putty.

Once this is done we need to compile the sendmail configuration.  The easiest way is with the following command:

sendmailconfig

Respond yes to the various prompts and now your sendmail install should forward all emails out via the newly defined smarthost.

Failing this you could try using m4 with the following command: (Make sure you are in the right directory)

m4 sendmail.mc > sendmail.cf

While the default configuration is reasonable with sendmail it would be wise to make sure you aren’t creating an open relay here.  Consider checking and if required setting up an iptables /firewalld rule to block unwanted hosts from connecting to port 25.

Also review the contents of /etc/mail/relay-domains and make sure you are only relaying mail for domains you intend to.  Any changes here will require a sendmail service restart.

service sendmail restart

WinRM Connection limits

Sometimes in various Microsoft products (Exchange/VMM mostly) you might reach some of the WinRM connection limits.  Personally I see it most in Virtual Machine Manager when you have many admins who are making lots of changes and deploying large numbers of services.

The symptom is sometimes an error like this:  Error Connecting to remote server failed with the following error message: The WS-Management service cannot process the request. This user is allowed a maximum number of 5 concurrent shells, which has been exceeded. Close existing shells or raise the quota for this user.

It can also just show as a generic Failed/timeout job which then works when you re-try later.

1. On the offending server open a command prompt or Powershell window with administrative privileges.
2. Type in winrm get winrm/config/winrs to view the current configuration.

winrmmax

These values will need to be increased, don’t just add a load of zeros to the end as having limits configured can stop unwanted or malicious connections from brining a server to its knees.

To adjust the values use the commands below where 20 and 100 are appropriate numbers for your environment.

3. winrm set winrm/config/winrs @{MaxConcurrentUsers=”20″}
4. winrm set winrm/config/winrs @{MaxShellsPerUser=”100}

How to create an Operations Manager 2012 R2 alert on active directory account lockout or any other event

Over the various versions of windows server there have been many different event IDs logged when accounts are locked out after too many failed logon attempts.  The event you are after for 2008 R2 / 2012 is Event ID 4740 and it is logged in the security event log.

It is possible to use a simple scheduled task which runs with this event ID as the trigger to generate an “account is locked” email, but why do that when you have operations manager?

We can create a new rule to alert on this event and it is also even possible to base the alert on other items within the event description.  For example you might want a generic account is locked email to go to the support desk, whereas alerts for a critically important service account should go to a separate team who manage this service.   Here is a guide on how to setup such an alert.

1. Load up the operations manger console and click on “Authoring”

2. Expand the “Management Pack Objects” item and click on “Rules.”

3. Click on “Create a rule.” This is in the tasks pane on the right hand side, you might need to expand this if you have previously closed it.

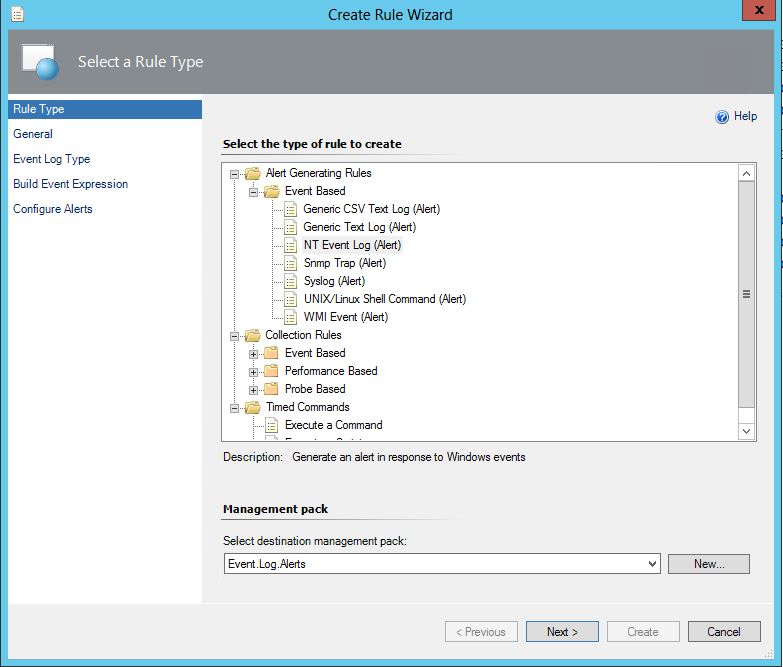
4. Expand “alert Generating Rules” then expand “Event based” and select “NT Event log (alert)” and select an appropriate management pack to store the alert.  I would reccomend creating a management pack for all your custom rule based alerts or if you plan on having many it maybe worth breaking it out further, e.g. “Account Lockout Alerts”

createarulewizard

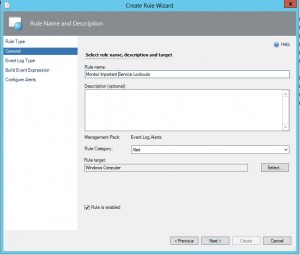
5. Click “Next” and give your new rule a suitable name.

6. Select a rule target, in this instance “Windows Computer” will work and click “Next.”

rulename

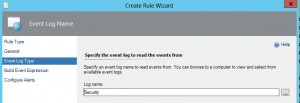
7.  Select the Log you wish to monitor, for this rule we need to select the security log then click “Next.”

securitylog

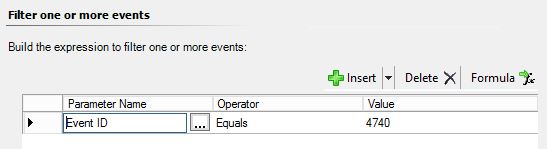
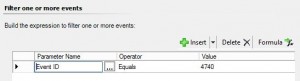
8. Now it is time to build the expression to filter the events we want to alert on.  If you simply want an alert any time this occurs set the parameter name to “Event ID” Operator to “Equals” and Value to “4740”.

simpleexpression

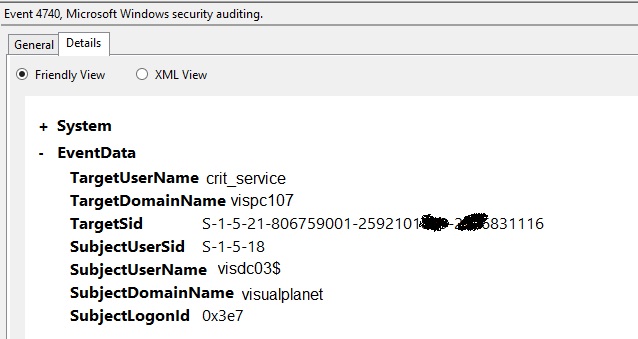
9. If however you want to be a little more presisce and only generate an alert for a particualr account or computer (or anything within the event) you can.  Simply locate an event you want to build an expression for on one of your target servers (e.g. log onto a DC and have a look for a security event with ID4740) and examine the details section.

4740eventdetails

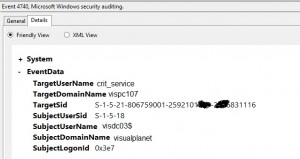
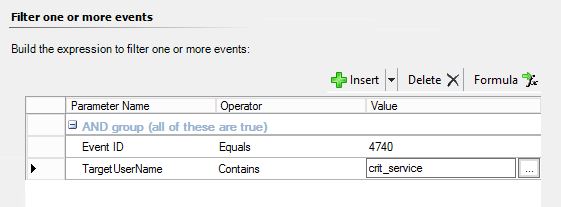
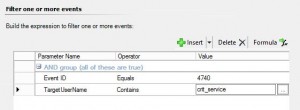
10. Here I want to configure the alert to only fire if the “crit_service” account is locked.  So within the expression builder I insert a new expression and select an event property and enter my own.

Parameter Name: “TargetUserName”
Operator: “Contains”
Value “crit_service”

fullexpression

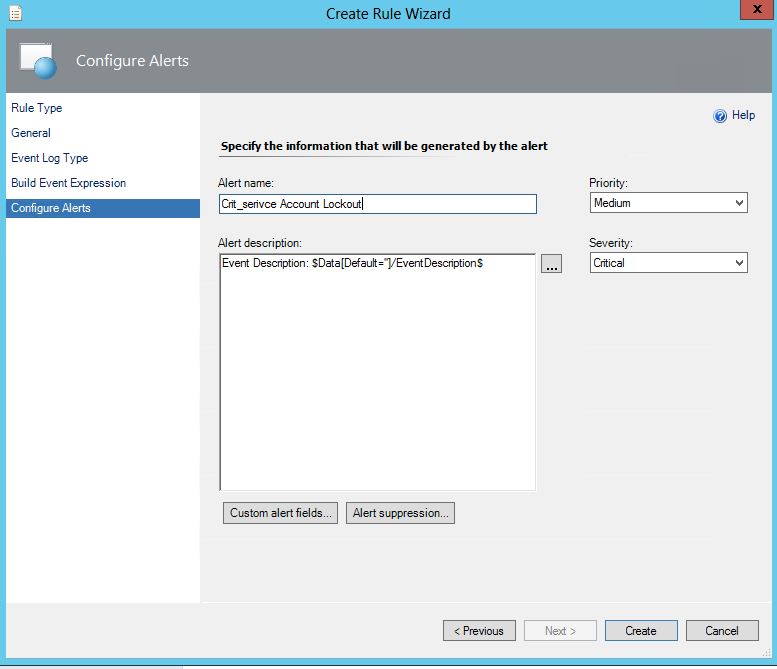
11. Finally configure the alert.  Here you can edit the alert name, description and other fields.  I simply changed the alert name and left the alert description and other fields alone as it is fine for my purposes.

configurealert

12.  Dont forget to setup an alert subscription for this so the right people get an alert when the account is locked out!  If you took a note of the alert name used you can filter against this to make sure only the right people get the message.

WMI reset failed

Recently I have found myself in a position where I have needed to reset WMI to resolve various problems such as SCCM client failing to install/detect and disappearing cluster namespaces.  Generally resetting the WMI is a last resort and should only be tried when you have tried all other options. e.g. restart WMI service, restart server.

The command to reset the WMI repository must be run in an admin / elevated command prompt:

winmgmt /resetrepository

However sometimes this fails with this error:

C:\Users\adminuser>Winmgmt /resetrepository
WMI repository reset failed

Error code:     0x8007041B
Facility:       Win32
Description:    A stop control has been sent to a service that other running services are dependent on.

While it is possible to work around this by stopping the dependent services manually or even editing the registry so that nothing is dependent on this (as I have seen suggested else where) there is a much easier solution.

1. Launch an elevated (admin) powershell window.

2. Enter the following command.

Stop-Service winmgmt -Force; winmgmt /resetrepository

3. Restart the computer you just reset the WMI repository on.

User Profile Service service failed the logon. User profile cannot be loaded

Most people who work in a windows environment for some time will have seen profile corruption before where a single user cannot log in or looses settings with the fix often being to log on as someone else and remove the profile completely allowing a new working profile to be created or restoring from a backup.  But what about when no one can log in including new users?  I recently came across this problem where a server gave everyone who attempted to log in, including new users a “User Profile Service service failed the log in. User profile cannot be loaded” message.

Profile error message

Everything else was working correctly, I could remotely stop and start services, browse administrative shares and even open the registry.  The culprit turned out to be bad permissions on the default user profile.
To fix, make sure you have turned on show hidden files and folders and also unticked “Hide protected operating system files” on the computer you are connecting from.

unhide files and folders

Next, browse to the administrative C: drive share on the computer which fails all log ons:  \\computername\c$\users\ and right click on “default” and then on “properties”

Next click on the “Security” tab at the top and then on the “advanced” button at the bottom. (You should see the window below)

Advanced Permissions

Next, click on “Change permissions” and then tick the box next to “Replace all child object permissions with inheritable permissions from this object” and then on OK.  This should re-apply the permissions on this folder and permit profiles to be re-created again.

replace child permissions with inheritable

Convert a .pfx certificate to a .pem

As is often the case different bits of software require things in different formats and you might find yourself with a pfx file when you really need a pem file.

It is pretty simply to convert a pfx into a pem with open SSL. Assuming you are on windows download and install the win32 OpenSSL package from http://www.slproweb.com/products/Win32OpenSSL.html

Then you can simply open a command window and change directory to the location of your OpenSSL install. (by default C:\OpenSSL-Win32\bin)

Then execute the following command: (where C:\cert\certfile.pfx is your source pfx file and C:\cert\certfile.pem is the desired name and location of the exported pem file.)

C:\OpenSSL-Win32\bin>openssl pkcs12 -in C:\cert\certfile.pfx -out C:\cert\certfile.pem -nodes

Note: you will be prompted to enter an import password if the pfx file is password protected.

If all is well you should see “MAC verified OK” and the .pem file will be written.

pfx to pem with openssl screenshot

Drive Error when mounting an ISO in idraq: Either Virtual Media is detached or redirection for the selected virtual disk drive is already in use

When you try to mount an ISO file in iDRAQ you get the following message: Either Virtual Media is detached or redirection for the selected virtual disk drive is already in use
The screen looks like this:

drive error

To fix this:

  1. On the iDRAC screen, click on “System”.
  2. Then, click on the “Console/Media” tab and then on “Configuration”.
  3. Select “Attach” on the drop down under “Virtual Media”.
  4. Lastly scroll down and click on “apply”
  5. Mount the ISO as you did before, you should now be able to mount it as expected.

Enabling Agent Proxy for all System Center Operations Manager Agents

SCOM is likley to require the proxy to be enabled on a large number of agents, certainly it is the case with a lot of the management packs and it can often be easier to enable it on all agents and then turn it off on the agents which don’t require it.

In any case, enabling the SCOM agent proxy on all agents is a simple power-shell one liner:

Get-SCOMAgent | where {$_.ProxyingEnabled.Value -eq $False} | Enable-SCOMAgentProxy

You can always modify the filter as required to match your own needs.  For example, to only enable the proxy on Agents installed within the last 3 months:

Get-SCOMAgent | where {$_.InstallTime -gt ((Get-Date).AddMonths(-3))} | Enable-SCOMAgentProxy