SCOM 2016 Domain controllers agent status greyed out

I have noticed with operations manager 2016 that by default the agent enters a grey state on all domain controllers. This looks to be caused by a permissions problem with either the local system account (Or your alternative if you have configured one) Fortunately it is a simple fix. Assuming you have winrm setup and working and have administrator access the following should resolve the issue for you:

1. Connect to the server with the grey status:

WINRS -r:MYDCNAME01 cmd.exe

2. Change directory to the Agent location:

cd “C:\Program Files\Microsoft Monitoring Agent\Agent”

3. use the hslockdown program to permit your useraccount.

HSLockdown.exe /A “NT AUTHORITY\SYSTEM”

and/or

HSLockdown.exe /A “mydomain\someaccount”

4. Stop and start the health service:

net stop healthservice
net start healthservice

Your agent status should shortly turn green. Happy monitoring!

Monitoring and managing an Ubuntu Linux server in System Center Operations Manager 2012 R2

First we need to make sure we have a “run-as” account setup in SCOM for Linux machines.  You can find this in Administration>UNIX/Linux account and “Create Run As Account”  This account does not need to be the same as the account you use to discover and install the agent however in a lab or simple environment you might choose to make it the same account.

Next we need to create a local account for SCOM to install deploy the agent and manage the Ubuntu machine.  This might be the same username and password you used for your “run-as” account but doesn’t have to be.  Log on to your Ubuntu server and run the following command and follow the on screen prompts to create a password.

sudo adduser scomaccount

Now we need to let this account use sudo with no password.  So do this run:

visudo

add this line to the very bottom of the file and then save and exit.

scomacc ALL=(ALL) NOPASSWD:ALL

Before running the discovery wizard in SCOM check both forward and reverse DNS lookups for your ubuntu server work correctly, for example the following commands run on your SCOM server should return the name and IP address.  You will get an error if these addresses are wrong.

nslookup linux server

nslookup 10.0.4.56

When running the discovery wizard enter the account details you setup above, but make sure to select the account is not privileged and that it needs sudo elevation but leave the password blank in the elevation section.

scom account 1

scom account 2

You should now be ready to click on discover tick the server and then click on manage.  If your Linux machine has only a single name host name you will likely see a certificate error.  To fix this either change the host name on your Linux box to be the correct FQDN or manually create a new certificate with the command below on your Ubuntu server:

/opt/microsoft/scx/bin/tools/scxsslconfig –h linuxserver01 –d yourdomain.com -f –v

where linusserver01 is your hostname and yourdomain.com is the fully qualified domain name that your Linux server resolves to in DNS.  Once this has been run you should be able to click back and then on manage again and it will retry.  If all is well you should see the below.

scom success

How to create an Operations Manager 2012 R2 alert on active directory account lockout or any other event

Over the various versions of windows server there have been many different event IDs logged when accounts are locked out after too many failed logon attempts.  The event you are after for 2008 R2 / 2012 is Event ID 4740 and it is logged in the security event log.

It is possible to use a simple scheduled task which runs with this event ID as the trigger to generate an “account is locked” email, but why do that when you have operations manager?

We can create a new rule to alert on this event and it is also even possible to base the alert on other items within the event description.  For example you might want a generic account is locked email to go to the support desk, whereas alerts for a critically important service account should go to a separate team who manage this service.   Here is a guide on how to setup such an alert.

1. Load up the operations manger console and click on “Authoring”

2. Expand the “Management Pack Objects” item and click on “Rules.”

3. Click on “Create a rule.” This is in the tasks pane on the right hand side, you might need to expand this if you have previously closed it.

4. Expand “alert Generating Rules” then expand “Event based” and select “NT Event log (alert)” and select an appropriate management pack to store the alert.  I would reccomend creating a management pack for all your custom rule based alerts or if you plan on having many it maybe worth breaking it out further, e.g. “Account Lockout Alerts”

createarulewizard

5. Click “Next” and give your new rule a suitable name.

6. Select a rule target, in this instance “Windows Computer” will work and click “Next.”

rulename

7.  Select the Log you wish to monitor, for this rule we need to select the security log then click “Next.”

securitylog

8. Now it is time to build the expression to filter the events we want to alert on.  If you simply want an alert any time this occurs set the parameter name to “Event ID” Operator to “Equals” and Value to “4740”.

simpleexpression

9. If however you want to be a little more presisce and only generate an alert for a particualr account or computer (or anything within the event) you can.  Simply locate an event you want to build an expression for on one of your target servers (e.g. log onto a DC and have a look for a security event with ID4740) and examine the details section.

4740eventdetails

10. Here I want to configure the alert to only fire if the “crit_service” account is locked.  So within the expression builder I insert a new expression and select an event property and enter my own.

Parameter Name: “TargetUserName”
Operator: “Contains”
Value “crit_service”

fullexpression

11. Finally configure the alert.  Here you can edit the alert name, description and other fields.  I simply changed the alert name and left the alert description and other fields alone as it is fine for my purposes.

configurealert

12.  Dont forget to setup an alert subscription for this so the right people get an alert when the account is locked out!  If you took a note of the alert name used you can filter against this to make sure only the right people get the message.

Enabling Agent Proxy for all System Center Operations Manager Agents

SCOM is likley to require the proxy to be enabled on a large number of agents, certainly it is the case with a lot of the management packs and it can often be easier to enable it on all agents and then turn it off on the agents which don’t require it.

In any case, enabling the SCOM agent proxy on all agents is a simple power-shell one liner:

Get-SCOMAgent | where {$_.ProxyingEnabled.Value -eq $False} | Enable-SCOMAgentProxy

You can always modify the filter as required to match your own needs.  For example, to only enable the proxy on Agents installed within the last 3 months:

Get-SCOMAgent | where {$_.InstallTime -gt ((Get-Date).AddMonths(-3))} | Enable-SCOMAgentProxy

System Center Operations Manager 2012 SP1 Failes on Data warehouse step and setup log shows “Create File” error

When installing SCOM setup fails during the Data warehouse step and the setup log file contains an error similar to the following:  EXEC(@sql);: Threw Exception.Type: System.Data.SqlClient.SqlException, Exception Error Code: 0x80131904, Exception.Message: CREATE FILE encountered operating system error 5(Access is denied.) while attempting to open or create the physical file ‘E:\SystemCenterData.mdf’.

scom dw install bug 2
There is a bug in the Operations Manager SP1 installer which causes the file to be created in the wrong location.  During setup the location was configured to use “E:\SystemCenterData” for the Data path and “F:\SystemCenterLogs” for the logs however setup attempts to create the file as “E:\SystemCenterData.mdf”

One way to work around this issue is to amend the configured path for the data warehouse data and log files during setup.  Simply append the name of the database to the end of each path. (The main operations manager database and logs do not need this change.) for example using the locations E:\SystemCenterData\OperationsManagerDW for data and F:\SystemCenterData\OperationsManagerDW for logs will result in the files being created as E:\SystemCenterData\OperationsManagerDW.mdf and F:\SystemCenterData\OperationsManagerDW.ldf and setup can continue as expected.

SCOM DW install bug 3

System Center 2012 – Inside the Private Cloud

My three favorite parts of the System Center suite are Configuration Manager, Data protection Manager and Endpoint Protection.  These three products work well at making most of the chores of running an IT environment lighter


Configuration Manager & Endpoint Protection

This is, in my opinion, the flagship product of the System Center Suite.  Management of servers, workstations and even mobile devices is completed here and with Service Pack 1 an impressive list of operating systems and devices are supported including Linux and Mac OS.  The mobile device manager has now been brought into Configuration manager as well.  It is also within Configuration manager that you should deploy and manage Endpoint Protection.  Endpoint Protection was formally known as Forefront Protection, and I really hope this product continues being supported and isn’t eventually dropped like other forefront products have been, such as TMG. If you are lucky enough to have the standard or Enterprise CAL already (and you really should if you are looking at System Center) then it might be that you can save a fair bit of money by ditching your current Antivirus vendor and moving to Endpoint.

Typically in the past I would have used standard windows deployment from a share or USB volume or another vendor’s solution such as Ghost as the configuration manager effort wasn’t always worth the reward.  Deployments are now a lot easier and when tied with a decent collection of drivers and task sequences it is simple to quickly cater for a new situation or model of desktop or server.


Data Protection Manager

In my experience no backup solution is perfect and generally each has its strength and weaknesses.  With the 2012 iteration of Data protection manager the Microsoft offering is looking to be more of the former and less of the latter.

DPM is great at backing up Microsoft own products and applications and I have been using it to back up nearly 2TB of Exchange data and a large SharePoint Farm as well.

DPM offers many of the features an enterprise backup solution should, such as continuous protection, differential and incremental backups as well as Disk to disk and Disk to Tape backups.  I feel that it is only in the scheduling and retention options that DPM starts to fall down.  Typically I like to keep daily data for a month, weekly data for 2-6 months, month end for 2 years and year end data for even longer but unfortunately the retention a scheduling options don’t really cater for this approach, you simply have a hard limit on how long you can retain backup data with disk to disk used for short term and a second schedule for long term tape backups.  This leads to me using a different product to perform end of month backups simply so that I can keep them for longer than the other tape backups.

Generally DPM performs very well and can perform backups in shockingly fast order but it can have a tendency to occasionally mark replicas as bad or fail a snapshot only for it to succeed later without issue.  Quite possibly a quirk of the environment I have evaluated it in but something which seems to happen with other solutions a lot less often.  Also on upgrading on to sp1 be prepared to check the consistency of every replica and build the time taken for this into your upgrade plan.

Service pack 1 is definitely worth the upgrade as it sees a number of feature improvements such as support for deduplicated volumes and is the final piece in the puzzle to getting dedupe working on cheap hardware.  With Windows Server 2012 and Data Protection Manager you can use deduped volumes without the need to buy expensive storage solutions and licenses.  The useful extra features don’t end there, Cluster shared volumes can now be backed up as well as continuous protection of Hyper-V guest machines even while they are being live migrated.


Virtual Machine Manager

Virtual Machine Manager is to Hyper-V as vCentre server is to VMware.  VMM is the only real additional software cost you will have to bare if you want to use a full Hyper-V clustered solution. (God help anyone who wants to manage a large cluster of Hyper-V hosts as individual servers) The thought obviously being that if Microsoft gives you the Hyper visor for free you won’t balk at paying for the management tools and I expect a good number of people will buy the System Center Suite simply to be able to run Virtual Machine Manager.  If this sounds like you I hope you at least try the other parts of the System Center suite as they are worth a good look.


Orchestrator

Orchestrator is the centre point of the System Center suite and ties all of the other products together to make an intelligent workflow based automation solution.  It is based on software Microsoft acquired when it purchased Opalis back in 2009.

Orchestrator makes sense in the larger environments or when a requirement for automation is present such as in managed hosting.  It will likely be less use in smaller environments as the time taken to configure and automate tasks won’t have quite the same payback.

With Orchestrator it is possible to automate almost anything from deploying VMs through to recovering from an error condition in a service.  You can even find Integration packs from various vendors which lets you control and automate them from Orchestrator.


Operations Manager

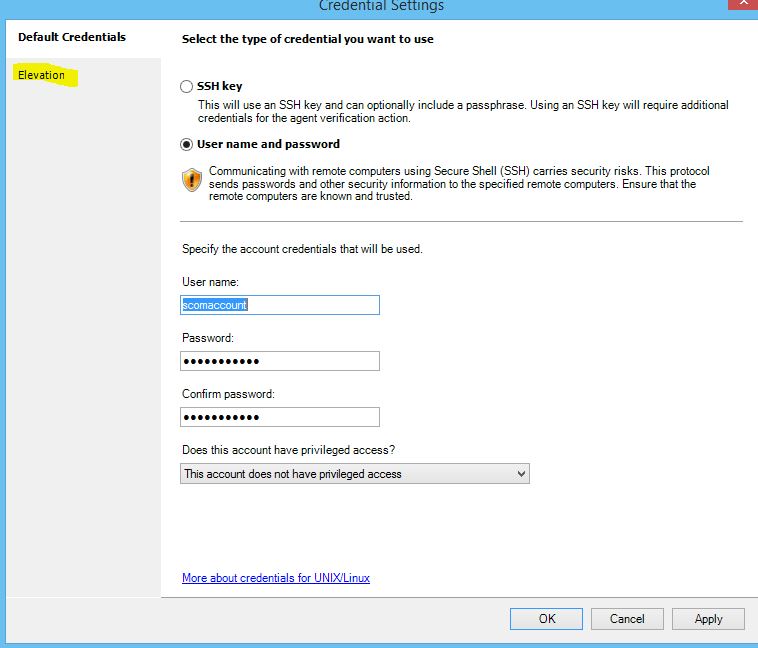
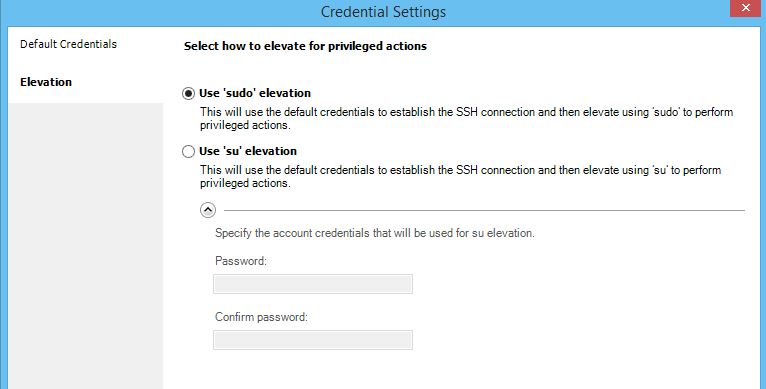
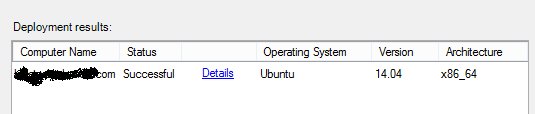
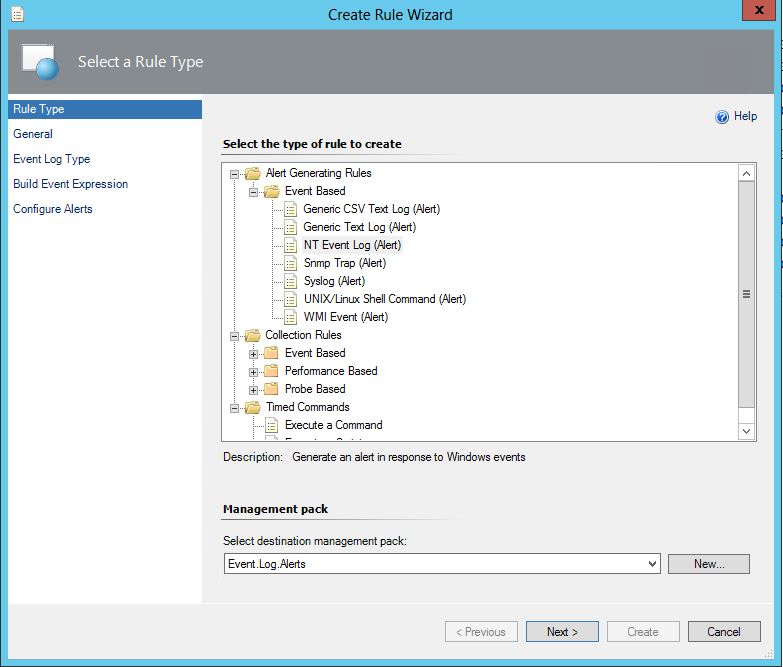
Operations Manager is Microsoft monitoring and alerting system and in the latest version it does a lot more than peer into event logs and give you a huge list of errors.  As with the rest of the System Center Suite Service Pack 1 introduces support for Linux which enhances the appeal of Operations manager a little and the list of supported applications and devices seems to be constantly growing as well.  No doubt pure Linux environments will be running Nagios or something similar but for mixed or pure Microsoft environments Operations manager is definitely one of the best out there.


Service Manager

Service Manager is the System Center component I have spent the least time looking at.  It is hard to get excited about help desk solutions, especially when so many spend so long logged into them.  Possibly the best feature of Service Manager is the auditing and reporting.  If correctly configured with orchestrator Service Manager can help you to identify why problems are occurring or when changed were made which could have contributed to an issue.  Service Manager doesn’t feel like the kind of product people would buy on its own, but if you have already paid for the full System Center suite you would have to be silly not to at least try it and as with all of the other solutions mentioned here, generally the longer you use them, the more you come to realise how powerful and  they are.


Unified installer

There is a unified installer which is great for quickly deploying the whole System Center Suite and you can read all about my experience here I also urge you to click through some of the categories above for more System Center related posts.

System Centre Operations Manager Release Candidate Setup

Following on from the unified installer for the Microsoft private cloud, the System centre operations manager installation failed and I decided to attempt the installation myself.

Once you have a suitable server setup with windows 2008 R2 the first step is to install the .NET Framework 4, report viewer and all the required IIS roles:

IIS6 Metabase Compatibility role service.
ASP.NET role service.
Windows Authentication role service.
Static Content role service.
Default Document role service.
Directory Browsing role service.
HTTP Errors role service.
HTTP Logging role service.
Request Monitor role service.
Request Filtering role service.
Static Content Compression role service
IIS Management Console role service.

Even with all the correct roles and pre-requisit software installed the validator will still throw up a couple of problems.


You will need to load the IIS Manager and open the ISAPI and CGI Restrictions properties and change the deny to an allow for the ASP.NET v4.0.30319 line.


In addition to the above if you installed the .NET 4 framework before the roles you will get an error message: “The ISAPI and CGI Restrictions are disabled or missing” on validating the pre-requisites and will need to run the following command in a cmd window to resolve the problem.

%WINDIR%\Microsoft.NET\Framework64\v4.0.30319\aspnet_regiis.exe –r

If all is well the command window should look like this:


Now setup should allow you to proceed with setup and select weather to add a management server to an existing management group or create the first management server in a new management group.  I like most people playing with the release candidate chose the latter.

Next you are prompted to supply the SQL server details.  In my environment the failed unified installer attempt had left a default SQL instance installed which appeared to be unsuitable as the installer complained I was missing the “Full text indexing” features required.  I had used the SQL 2008 R2 express media which does not include this option (and according to tech-net not on the list of supported SQL versions) so my next steps were to remove the currently installed SQL instance and install a full fat version of SQL 2008 R2 Standard with the full text indexing and reporting services options.  In a production setup you may well choose to create a new database on an existing server but for the purposes of evaluating this I selected to have a local instance of SQL installed as it makes cleaning up this install later a lot easier as I can just destroy the VM.

With the advanced services options installed the operations manager setup wizard will allow you to continue and adjust the configuration of the operational database (although I just left these at the defaults)


On clicking next you should see a similar screen for the datawarehouse database.  Again I accepted the defaults and continued on to choose the reporting services instance I installed earlier with SQL 2008 R2 Standard (don’t forget to run the Reporting Services configuration manager and start the SQL Server agent service)


Next it is time to choose which IIS site to use for the web console.  In a production environment it would be prudent to configure a new site and setup SSL however I am sticking with the default website for now.


Next you are prompted to select an authentication mode for use with the web console.  I selected Mixed Authentication as it will be an entirely private deployment for evaluation/testing purposes only.

After selecting the authentication mode you are prompted to supply some domain account/s for the various roles to use.  I created a single user for this purpose however it would be advisable to separate the data and management accounts so you can fine tune the permissions they are granted.


After this step you can choose to opt-in (or not) to the various customer experience improvement programs.  I chose not to as this machine has no Internet access anyway.

Finally you are presented with a page full of the various configuration options set in the previous steps.  If all looks well click install, go grab a tea/coffee and you should be able to return to an installed SCOM 2012.


Next I will work on getting a few servers monitored and start evaulating what is avaliable in SCOM 2012.

Evaluating the Microsoft Private Cloud with the System Centre 2012 Unified Installer

After reading a lot about Hyper-V and attending an IT Camp at Microsoft I really wanted to give the new SCCM 2012 a closer look and at the same time get better acquainted with Hyper-V and other related upcoming Microsoft releases such as Data protection Manager and Service Manager.

Getting all the installation files and pre-requisite software downloaded

Sign up and download all the installation files here: http://technet.microsoft.com/en-us/evalcenter/hh505660 (6.6GB) and in addition to this you will need all of the pre-requisite software which is listed here: http://technet.microsoft.com/en-us/library/hh751268.aspx  I went through a fair bit of trial and error to get the set-up utility to detect all of the installation files and I recommend making sure to extract each of the products into their own folders.  Don’t put all of the products in one folder or share folders as if the installer doesn’t recognize one of the paths/files you wont be able to tell which one (plus its messy and you might end up over writing files) I would also suggest you do the same for all of the pre-requisite software. (also don’t forget to extract all of the zip/exe/iso files as the unified installer wont read them otherwise.  I found winrar invaluable for this)


Preparing the installation environment and servers

To get all the products installed you need at least 8 servers (physical or virtual) with a minimum of 2GB of ram each.  I set all mine up on a single Hyper-V host as its only for testing purposes and I don’t have loads of servers spare for development/testing work.  I would also suggest using a sensible naming convention or it can get pretty confusing quite quickly and bare in mind that the server you choose to initially run the set-up on will become the Orchestrator server.

Aside from the base windows 2008 R2 operating system all the machines need to have a few things configured before they are ready for deployment.  To avoid duplication I made sure all of the servers were in a single OU and created a policy to apply the customizations for me rather than individually configuring the local policy on each host.

Computer Config \ Administrative Templates \ System \ Credentials Delegation \ Allow Delegating Fresh Credentials
Set to = Enabled
Server = WSMAN/*

Computer Config \ Administrative Templates \ System \ Credentials Delegation \ Allow Delegating Fresh Credentials with NTLM only server Authentication
Set to = Enabled
Server = WSMAN/*

Computer Config \ Administrative Templates \ Windows Components \ Windows Remote Management (WinRM) \ WinRM Client \ Allow CredSSP authentication
Set to = Enabled

Computer Config \ Administrative Templates \ Windows Components \ Windows Remote Management (WinRM) \ WinRM Client \ Trusted Hosts
Set to = Enabled
TrustedHostList = *

Computer Config \ Administrative Templates \ Windows Components \ Windows Remote Management (WinRM) \ WinRM Service \ Allow Automatic Configuration of listeners
Set to = Enabled
IPv4 filter = *
IPv6 filter = *

Computer Config \ Administrative Templates \ Windows Components \ Windows Remote Management (WinRM) \ WinRM Service \ Allow CredSSP authentication
Set to = Enabled 

Computer config \Administrative Templates \ Network \ Network Connection \ Windows firewall \ Standard Profile \ Windows firewall Protect all network connection
Set to =  disabled

I then went round each server and ran a gpupdate to ensure they all applied the new policy before I attempted to run the unified set-up.


Running the unified installer

On running the unified set-up and selecting the products you are evaluating (I wanted to try all of them) you are prompted to provide a path to each of the installation files you downloaded earlier.  (I bet you are glad you downloaded and extracted each of the products/pre-requisites into their own folders now) if all is well it should be a simple exercise of browsing and selecting each of the folder paths created earlier.  Dont be surprised if it doesnt recognize one of the paths or files just make sure you have the right product/version and its extracted, even the iso file for the windows automated installation kit needs to be extracted so its just a normal folder full of files.  (UNC or local path names are both OK.)


Once you have completed both this screen and the pre-requisites page that follows it you can select what account you wish to use as the installer account.  I created my own domain user for this but you can use any user account which has the required permissions.  Following this you can configure other options such as site name etc. and finally you are presented with an install button.  Sit back and watch the progress bars.