Redirecting traffic with Apache

There are two main types of redirection. The first is where you want to change a domain or server but you want to preserve the pages and URLs. For example, a company changes name from company1 to company2 and you want to redirect everyone from http://company1.com/ to http://company2.com/ while keeping all of the pages. For example, you would want a visitor clicking a link to http://company1.com/pages/page.html to be redirected to http://company2.com/pages/page.html

This is easy to accomplish with a simple redirect in the virtual host. For example:


ServerName company1
ServerAlias company1.com
Redirect “/” “https://company2.com/”


ServerName company1.com
SSLEngine On
SSLCertificateFile /etc/ssl/apache/company1-com.pem
SSLProtocol all -SSLv2 -SSLv3
SSLCipherSuite ECDH+AESGCM:DH+AESGCM:ECDH+AES256:DH+AES256:ECDH+AES128:DH+AES:RSA+AESGCM:RSA+AES:!aNULL:!MD5:!DSS
Redirect “/” “https://company2.com/”

Another scenario is that perhaps company1 has stopped trading or maybe the site is down for maintenance and you want to send all traffic to a static page. In this example, we redirect to a complete URL which could be hosted elsewhere or on the same server.


ServerName company1
ServerAlias company1.com
RewriteEngine On
RewriteRule ^.*$ https://company2.com/maintenance.html


ServerName company1.com
SSLEngine On
SSLCertificateFile /etc/ssl/apache/company1-com.pem
SSLProtocol all -SSLv2 -SSLv3
SSLCipherSuite ECDH+AESGCM:DH+AESGCM:ECDH+AES256:DH+AES256:ECDH+AES128:DH+AES:RSA+AESGCM:RSA+AES:!aNULL:!MD5:!DSS
RewriteEngine On
RewriteRule ^.*$ https://company2.com/maintenance.html

Please note that if you want to redirect to a page on the same server or domain you will need an additional line before each “rewriterule” preventing the redirect from kicking in on that page. If you don’t you will have an endless redirect loop.

e.g.

RewriteCond %{REQUEST_FILENAME} !/maintenance.html

Ubuntu /boot partition keeps filling up – move /boot to the root partition

Many of the ubuntu computers I look after were setup with a reasonable (at the time) 200MB /boot – in fact I think this was one of the default options in the Ubuntu setup. The default behaviour of the unattended updates package appears to install new kernels and not remove old ones. Combine this with the fact that the kernels are getting larger and 200mb is just not enough to maintain a few versions any more.

Rather then messing about with partition resizing or building a new machine out we can just move /boot onto the much larger root drive.

Make sure to either run these as sudo (or switch to root with sudo -s)

1. Take a backup of your server.

2. Copy the contents of boot over, remove the old one and rename.

cp -a /boot /boot2
umount /boot
rmdir /boot
mv /boot2 /boot

3. Now comment the /boot entry in /etc/fstab (Just add a # infront of the line that mounts boot):

vim /etc/fstab

4. Update grub and make sure everything is correct:

update-grub

5. Now reboot the computer and check everything is working – if not use the advanced options and try and alternate kernel version. Failing that restore from your backup.

Remove landscape client service from ubuntu

You may have your reasons, as I did for removing this client from a server. The process is very simple.

If you have the full GUI install:

sudo apt-get remove landscape-client landscape-client-ui landscape-client-ui-install landscape-common

If you have a cli only install:

sudo apt-get remove landscape-client landscape-common

Quickly check the dates on a certificate from the command line in Linux

sometimes you need to quickly check an endpoint or site and grab the dates/ when a certificate expires.  Of course you could just log onto the server in question and inspect the certificate or try and coax your browser into letting you view the certificate properties.  That said this is often quicker and could be handy as part of a larger script, check or automation piece.

This quick one liner will show us when the certificate on centos.org is valid for, just change the site name and port to that of the endpoint you want to check.

[root@tst-sh01~]# echo | openssl s_client -connect centos.org:443 2>/dev/null | openssl x509 -noout -dates
notBefore=Jul 29 00:00:00 2014 GMT
notAfter=Aug  2 12:00:00 2017 GMT

Linux file system is full, but can’t find any large files? – When df and du don’t agree

Often df and du do not agree as df will be reporting on the disk space that is used by reading the filesystem meta data while du and ncdu report the disk space that is used by reading the information from the directory tree. Reading the whole tree is slower but it gives you a better picture of where the data is. I recently came across a situation where snmp was reporting a disk as nearly full and sure enough df- h shows that things are nearly full:

root@test-t3-01:~# df -h
Filesystem Size Used Avail Use% Mounted on

udev 16G 0 16G 0% /dev

tmpfs 3.2G 17M 3.2G 1% /run

/dev/mapper/ubuntu1404lts–vg-root 8.5G 7.5G 587M 93% /

tmpfs 16G 472K 16G 1% /dev/shm

tmpfs 5.0M 0 5.0M 0% /run/lock

tmpfs 16G 0 16G 0% /sys/fs/cgroup

/dev/sda1 236M 87M 137M 39% /boot

While du shows a different picture:

root@test-t3-01:~# du -Lsh /
5.4G /

So df thinks 7.5G is used while du thinks only 5.4G is in use. Where is the missing 2.1G?

Initially I thought this could be due to hidden files or areas the process cannot read but it turned out to be something much simpler. When a file is deleted, but there is still an active process writing to it. The file is hidden from utilities like du as it is a deleted / unlinked file. Unfortunately the space is not actually released until the process stops writing to the file. Running lsof +L1 will show all files that are unlinked open files.

For example:

root@test-t3-01:~# lsof +L1
COMMAND PID USER FD TYPE DEVICE SIZE/OFF NLINK NODE NAME
dockerd 902 root 13r REG 252,0 1691426449 0 266537 /var/lib/docker/containers/d3569390cd7fed1eadba67627-json.log (deleted)
dockerd 902 root 14r REG 252,0 1691426449 0 266537 /var/lib/docker/containers/d3569390cd7fed1eadba678627-json.log (deleted)
dockerd 902 root 17w REG 252,0 1691426449 0 266537 /var/lib/docker/containers/d3569390cd7fed1eadba678627-json.log (deleted)
mysqld 924 mysql 4u REG 252,0 0 0 130242 /tmp/ib9FrYkL (deleted)
mysqld 924 mysql 5u REG 252,0 0 0 132358 /tmp/ibsW1bdg (deleted)
mysqld 924 mysql 6u REG 252,0 0 0 132359 /tmp/ibPi2p5K (deleted)
mysqld 924 mysql 7u REG 252,0 0 0 132360 /tmp/ibuTFORK (deleted)
mysqld 924 mysql 11u REG 252,0 0 0 132361 /tmp/ibH3DXVf (deleted)

The solution then becomes obvious, restart the server, process or service that is writing to these files.

Viewing and Deleting elasticsearch indexes

Generally I find it easiest to view the indexes on box by sending a command with curl.

for example this will list every index:

curl http://localhost:9200/_aliases

Unfortunately it lists it in a big block of text, to see it formatted in a nicer way try:

curl http://localhost:9200/_aliases?pretty=1

Now lets say for example you want to delete just one index. That can also easily be done with curl.

e.g.

curl -XDELETE localhost:9200/2015.06.01

Where everything after the / is your index name.  If this works you should have a response from the server of:

{“acknowledged”:true}

If you mistype or the index is already gone you might see this returned:

{“error”:”IndexMissingException[[bacon] missing]”,”status”:404}

Check the name issues and maybe list all the indexes again so you can be sure they aren’t already gone or you have the wrong name.

You can also use wildcards to delete similarly named indexes. So if for example I wanted to delete all the June indexes I could issue this command:

curl -XDELETE localhost:9200/2015.06*

One gotcha with the wildcard is that you always seem to get a response of {“acknowledged”:true} even if you give a name and wildcard that matches nothing, so make sure you have the right name and to check the indexes after issuing the command.

Monitoring and managing an Ubuntu Linux server in System Center Operations Manager 2012 R2

First we need to make sure we have a “run-as” account setup in SCOM for Linux machines.  You can find this in Administration>UNIX/Linux account and “Create Run As Account”  This account does not need to be the same as the account you use to discover and install the agent however in a lab or simple environment you might choose to make it the same account.

Next we need to create a local account for SCOM to install deploy the agent and manage the Ubuntu machine.  This might be the same username and password you used for your “run-as” account but doesn’t have to be.  Log on to your Ubuntu server and run the following command and follow the on screen prompts to create a password.

sudo adduser scomaccount

Now we need to let this account use sudo with no password.  So do this run:

visudo

add this line to the very bottom of the file and then save and exit.

scomacc ALL=(ALL) NOPASSWD:ALL

Before running the discovery wizard in SCOM check both forward and reverse DNS lookups for your ubuntu server work correctly, for example the following commands run on your SCOM server should return the name and IP address.  You will get an error if these addresses are wrong.

nslookup linux server

nslookup 10.0.4.56

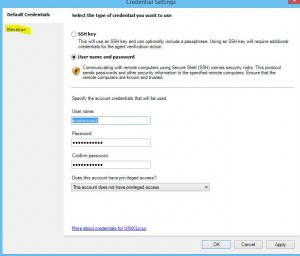
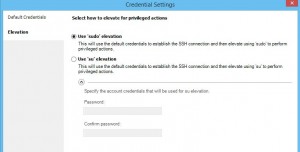
When running the discovery wizard enter the account details you setup above, but make sure to select the account is not privileged and that it needs sudo elevation but leave the password blank in the elevation section.

scom account 1

scom account 2

You should now be ready to click on discover tick the server and then click on manage.  If your Linux machine has only a single name host name you will likely see a certificate error.  To fix this either change the host name on your Linux box to be the correct FQDN or manually create a new certificate with the command below on your Ubuntu server:

/opt/microsoft/scx/bin/tools/scxsslconfig –h linuxserver01 –d yourdomain.com -f –v

where linusserver01 is your hostname and yourdomain.com is the fully qualified domain name that your Linux server resolves to in DNS.  Once this has been run you should be able to click back and then on manage again and it will retry.  If all is well you should see the below.

scom success

Configure sendmail to relay via smarthost

Sendmail appears to be falling out of favour to other MTAs such as postfix but I often find myself using it because it tends to be available on every distribution and is still widely used.  Problems or security issues are usually quickly patched.  Sendmail is definately one of the harder MTAs to configure so if you are looking to do more than basic relaying you might be better of learning how to configure postfix instead.

Assuming you have sendmail pre-installed or installed via:

apt-get install sendmail

or

yum install sendmail  (you might also need to install m4 to build the configurations)

Make sure your sendmail host can resolve and reach your smarthost relay, if required add an entry to your hosts file or setup your resolv file.

vi /etc/hosts

Now edit the sendmail.mc file in your favorite text editor:

vi /etc/mail/sendmail.mc

As here we are only setting up a single smart host just add the line:

define(`SMART_HOST’, `server.fqdn’)

Where server.fqdn matches the entry in DNS or your host file.  Make sure you use the exact format above, it might help to copy and paste this into your config file via putty.

Once this is done we need to compile the sendmail configuration.  The easiest way is with the following command:

sendmailconfig

Respond yes to the various prompts and now your sendmail install should forward all emails out via the newly defined smarthost.

Failing this you could try using m4 with the following command: (Make sure you are in the right directory)

m4 sendmail.mc > sendmail.cf

While the default configuration is reasonable with sendmail it would be wise to make sure you aren’t creating an open relay here.  Consider checking and if required setting up an iptables /firewalld rule to block unwanted hosts from connecting to port 25.

Also review the contents of /etc/mail/relay-domains and make sure you are only relaying mail for domains you intend to.  Any changes here will require a sendmail service restart.

service sendmail restart

Installing Google Chrome on Linux Mint 13 Maya

Simply downloading and running the .deb software package for Google Chrome results in an error with missing dependencies and a broken cache.  Running the suggested “apt-get install -f” does not resolve the situation either.

To get the browser up and running start by downloading and adding Google signing key:

wget -q -O – https://dl-ssl.google.com/linux/linux_signing_key.pub | sudo apt-key add –

Now lets download the deb file:

 wget https://dl.google.com/linux/direct/google-chrome-stable_current_amd64.deb (change stable to beta if you wish)

Finally install the Google Chrome package.  This should also add the Google Chrome repositories which will allow updates to Chrome in future.

 sudo dpkg -i google-chrome-stable_current_amd64.deb (change stable to beta if you wish)

Check out the following page for more information:

http://www.google.com/linuxrepositories/

Lync Client on Linux

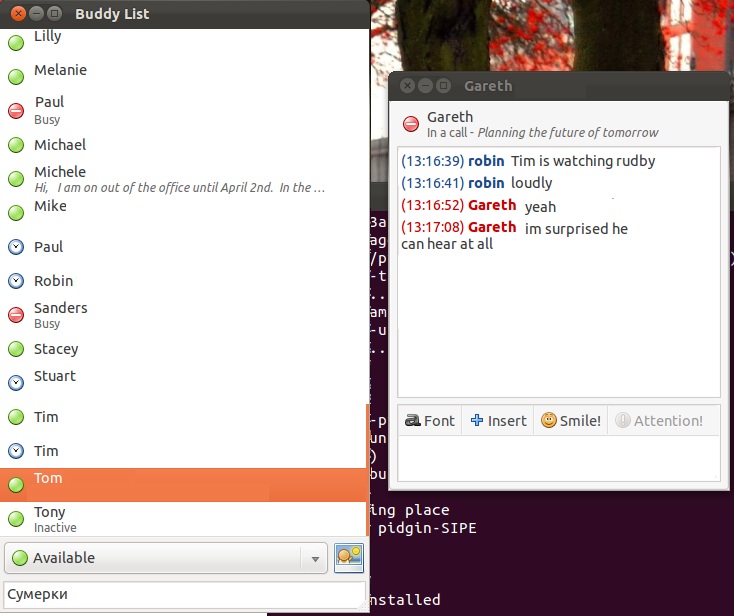
I have been wondering lately if it is possible to use Lync from a linux workstation.  As far as I am aware there is no official support or even a chance that the client will run outside of a virtual windows box or similar. (if somone has managed to get the Lync client running under wine or similar i’d love to hear about it) however it seems it is possible to at least have basic chat functionality using pidgin.

For my ubuntu laptop it was simply a case of running:

sudo apt-get install pidgin
sudo apt-get install pidgin-SIPE

Then running pidgin and adding my account details in as a “Office Communicator” account type.

For example:

Protocol: Office Communicator
Username: sipaddress
login: domain\user
Password: password

If all your services are published in DNS you wont need to mess about in the advanced tab but be warned you may get a certificate warning if you used self-signed certs.