Meltdown – Patching centos

The patches are out for centos 5/6/7 and you can install them simply by the normal update command.

yum update

and then restarting.

To check the patches are installed run:

rpm -q –changelog kernel | egrep ‘CVE-2017-5715|CVE-2017-5753|CVE-2017-5754’

and make sure you have entries for all three CVE numers.

Broken libc error: Can’t exec “locale”: No such file or directory at /usr/share/perl5/Debconf/Encoding.pm line 16.

When trying to fix a system that someone (something?) had managed to shoe horn a broken/old version of libc-bin onto an Ubuntu 14 server I ran in to this error when trying to run “Apt-get install” or “Apt-get upgrade”

Can’t exec “locale”: No such file or directory at /usr/share/perl5/Debconf/Encoding.pm line 16.
Use of uninitialized value $Debconf::Encoding::charmap in scalar chomp at /usr/share/perl5/Debconf/Encoding.pm line 17.
Preconfiguring packages …
dpkg: warning: ‘ldconfig’ not found in PATH or not executable
dpkg: error: 1 expected program not found in PATH or not executable
Note: root’s PATH should usually contain /usr/local/sbin, /usr/sbin and /sbin
E: Sub-process /usr/bin/dpkg returned an error code (2)
So you cant re-install or repair the libc package because the package manager depends on it working in the first place.

Fortunately we can download and install the package ourselves:

apt-get download libc-bin
dpkg -x libc-bin*.deb unpackdir/
sudo cp unpackdir/sbin/ldconfig /sbin/

This is enough to get apt-get install working again and we can reinstall the package properly, then upgrade.

sudo apt-get install –reinstall libc-bin
sudo apt-get install -f
sudo apt-get upgrade

SCOM 2016 Domain controllers agent status greyed out

I have noticed with operations manager 2016 that by default the agent enters a grey state on all domain controllers. This looks to be caused by a permissions problem with either the local system account (Or your alternative if you have configured one) Fortunately it is a simple fix. Assuming you have winrm setup and working and have administrator access the following should resolve the issue for you:

1. Connect to the server with the grey status:

WINRS -r:MYDCNAME01 cmd.exe

2. Change directory to the Agent location:

cd “C:\Program Files\Microsoft Monitoring Agent\Agent”

3. use the hslockdown program to permit your useraccount.

HSLockdown.exe /A “NT AUTHORITY\SYSTEM”

and/or

HSLockdown.exe /A “mydomain\someaccount”

4. Stop and start the health service:

net stop healthservice
net start healthservice

Your agent status should shortly turn green. Happy monitoring!

Quickly check the dates on a certificate from the command line in Linux

sometimes you need to quickly check an endpoint or site and grab the dates/ when a certificate expires.  Of course you could just log onto the server in question and inspect the certificate or try and coax your browser into letting you view the certificate properties.  That said this is often quicker and could be handy as part of a larger script, check or automation piece.

This quick one liner will show us when the certificate on centos.org is valid for, just change the site name and port to that of the endpoint you want to check.

[root@tst-sh01~]# echo | openssl s_client -connect centos.org:443 2>/dev/null | openssl x509 -noout -dates
notBefore=Jul 29 00:00:00 2014 GMT
notAfter=Aug  2 12:00:00 2017 GMT

ADFS Configuration Wizard Fails with Error “The certificates with the CNG private key are not supported”

When running the ADFS configuration Wizard or renewing a new service communications you will get a “The certificates with the CNG private key are not supported” error unless the certificate was created with a legacy non CNG key. There is a useful blog post here https://blogs.technet.microsoft.com/mspfe/2013/11/29/adfs-configuration-wizard-fails-with-error-the-certificates-with-the-cng-private-key-are-not-supported/ on what to do if you are using a Microsoft certificate authority.

Assuming you are using someone else’s CA the following steps can be used to get a CSR and legacy non CNG private key (Will work post sha1 sunset)

1. Run an MMC and add the local computers certificate store.

2. Expand Personal and Certificates, right click on Certificates > All tasks > Advanced > Create Custom Request.

3. Click on Next then select “Proceed without enrollment policy” and Next again.

4. Change the template to “(no template) Legacy key”

5. Expand the details drop down, click on Properties and make sure to set the correct CN, DNS names, country code etc as required. You must also set the key size to 2048 or higher and you may want to mark the key as exportable if you have other servers that need to share the same private key.

6. Click through and save the CSR and provide this to your CA.

7. When you have the certificate from the CA, import it to the personal store on this computer.

8. Run this command in PowerShell to determine the CertificateHash of the new certificate:

dir cert:\localmachine\my

Review the list of returned certs and note the Thumbprint of the new one.

9. You can now set the service to use this certificate. While the GUI will let you select the service certificate, the http.sys hosted SSL endpoint can only be updated in powershell so you might as well do both like that.

Set-AdfsCertificate -CertificateType Service-Communications -Thumbprint thumbprint

Set-AdfsSslCertificate -Thumbprint thumbprint

If you have any doubt as to what the service is configured to use either before or after the change you can run the equivalent get command. e.g. Get-AdfsCertificate

(If in doubt as to which one is configured, them get-adfssslcertificate can be run as well)

Linux file system is full, but can’t find any large files? – When df and du don’t agree

Often df and du do not agree as df will be reporting on the disk space that is used by reading the filesystem meta data while du and ncdu report the disk space that is used by reading the information from the directory tree. Reading the whole tree is slower but it gives you a better picture of where the data is. I recently came across a situation where snmp was reporting a disk as nearly full and sure enough df- h shows that things are nearly full:

root@test-t3-01:~# df -h
Filesystem Size Used Avail Use% Mounted on

udev 16G 0 16G 0% /dev

tmpfs 3.2G 17M 3.2G 1% /run

/dev/mapper/ubuntu1404lts–vg-root 8.5G 7.5G 587M 93% /

tmpfs 16G 472K 16G 1% /dev/shm

tmpfs 5.0M 0 5.0M 0% /run/lock

tmpfs 16G 0 16G 0% /sys/fs/cgroup

/dev/sda1 236M 87M 137M 39% /boot

While du shows a different picture:

root@test-t3-01:~# du -Lsh /
5.4G /

So df thinks 7.5G is used while du thinks only 5.4G is in use. Where is the missing 2.1G?

Initially I thought this could be due to hidden files or areas the process cannot read but it turned out to be something much simpler. When a file is deleted, but there is still an active process writing to it. The file is hidden from utilities like du as it is a deleted / unlinked file. Unfortunately the space is not actually released until the process stops writing to the file. Running lsof +L1 will show all files that are unlinked open files.

For example:

root@test-t3-01:~# lsof +L1
COMMAND PID USER FD TYPE DEVICE SIZE/OFF NLINK NODE NAME
dockerd 902 root 13r REG 252,0 1691426449 0 266537 /var/lib/docker/containers/d3569390cd7fed1eadba67627-json.log (deleted)
dockerd 902 root 14r REG 252,0 1691426449 0 266537 /var/lib/docker/containers/d3569390cd7fed1eadba678627-json.log (deleted)
dockerd 902 root 17w REG 252,0 1691426449 0 266537 /var/lib/docker/containers/d3569390cd7fed1eadba678627-json.log (deleted)
mysqld 924 mysql 4u REG 252,0 0 0 130242 /tmp/ib9FrYkL (deleted)
mysqld 924 mysql 5u REG 252,0 0 0 132358 /tmp/ibsW1bdg (deleted)
mysqld 924 mysql 6u REG 252,0 0 0 132359 /tmp/ibPi2p5K (deleted)
mysqld 924 mysql 7u REG 252,0 0 0 132360 /tmp/ibuTFORK (deleted)
mysqld 924 mysql 11u REG 252,0 0 0 132361 /tmp/ibH3DXVf (deleted)

The solution then becomes obvious, restart the server, process or service that is writing to these files.

Windows 2012 Dedupe – huge chunk store and 0%

One of the best new features in 2012 was the file de-duplication.  That said it does sometimes behave a bit strangely under some workloads.  I recently faced an issue where a a 40TB volume with de-duplication enabled resulted in a huge chunk store that was using more space than the original data!

chunky

At a glance it looks like the best thing to do is turn off dedupe for this volume, but all this seems to do is disable further dedup work, anything that is already deduped will remain so.  I found the best/fasted way to “re-hydrate” your data and get rid of the chunkstore (You could just format the volume if you don’t need the data) is to leave the dedupe enabled, but set an exclusion on the root.

Then run the commands below in power-shell (Assuming drive letter F:):

Start-DedupJob -Volume “F:” -Type unoptimization -Memory 50

Then run:

Start-DedupJob -Volume “F:” -Type GarbageCollection -Memory 50

You can then monitor the size of the chunkstore and/or run this command to see the progress of any “dedupjobs” with this command:

Get-dedupejob

dedupejob

Do bare in mind the increased IO and server load while this runs, it maybe best to start this out of hours.  Please also note that this command will only actually re-hydrate your files if dedupe is still enabled.

VMM Host not responding – WinRM Error and access is denied

If you have a Virtual Host in Virtual Machine Manager that is not responding, and forcing a manual refresh returns an error like this:

Error (2910)
VMM does not have appropriate permissions to access the resource C:\Windows\system32\qmgr.dll on the server.
Access is denied (0x80070005)

It can often be remedied by one of the following: Re-install the VMM agent, restart the virtual machine manager agent and WMI services or restart the virtual host.  It is also worth making sure your hosts are all up to date as well.

Occasionally I see a host where this doesn’t work and no matter what it, remains as “not responding” in VMM.  For me the case appears to be a broken winrm configuration.  You can be fooled into thinking winrm is setup correctly as a “winrm /quickconfig” returns as already setup, and the winrm service is running.

It looks like all the “winrm /quickconfig” command does is check that winrm has been enabled, it wont reset other possibly incorrect configurations or broken settings.

Comparing the winrm configuration and registry of a working identical host to a “not responding” host I have found the following commands will correct the deviated settings and usually results in a host that now responds to VMM.

reg add HKLM\SOFTWARE\Microsoft\Windows\CurrentVersion\Policies\System /v LocalAccountTokenFilterPolicy /t REG_DWORD /d 1 /f

winrm set winrm/config/service/auth @{CredSSP=”True”}
winrm set winrm/config/winrs @{AllowRemoteShellAccess=”True”}
winrm set winrm/config/winrs @{MaxMemoryPerShellMB=”2048″}
winrm set winrm/config/client @{TrustedHosts=”*”}
winrm set winrm/config/client/auth @{CredSSP=”True”}

Be sure to run these on the effected host in an admin command prompt.

Compacting / shrinking a VHDX

Sometimes you over provision a server and need the space back on your cluster shared volume or use a full fixed size disc and later want a dynamic one and then need to shrink it.   Or it could simply be you are making a template and want to compact the disk as much as possible for faster deployments and less disk space consumed on your VMM server.

Some of the steps here are also useful if you just want to find additional space on a windows server.  Step 1 outlines how to cleanup the component store and remove installation files for unused windows features.  (e.g. why keep the source files for the Remote desktop session host server role on a web server?) You can skip step 4 if you are just looking to shrink the file temporarily,  if the VHDX is for a VMM template or if you are just cleaning up a working server for more free space.

Here is the process:

1.  Clean up the disk first and remove any files or data you don’t need so that you can compact the disk as much as possible.

Here are a few options:

You can remove the source installation files for any roles and features you don’t need to save on disk space.  This can make it difficult or sometimes impossible to enable the features later though so proceed only if you are sure you don’t need other roles to be added later. Make sure to run this in an Admin powershell window.

Get-WindowsFeature | Where-Object {$_.Installed -match “False”} | Uninstall-WindowsFeature –Remove

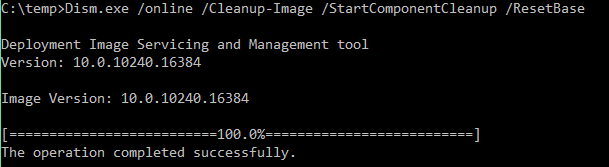
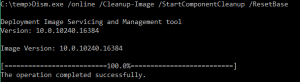
For 2012 R2 and other later windows versions you can also clean up the component store with DISM. This does mean you won’t be able to remove existing service packs and updates however future updates will be removable.

Dism.exe /online /Cleanup-Image /StartComponentCleanup /ResetBase

dism online cleanup-image

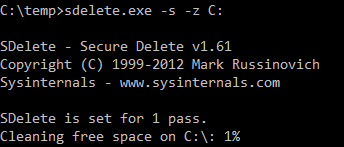
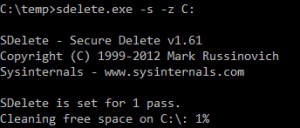
Clean up any temporary files, old profiles and all the other places you would usually look to free up more space. 2.  Grab a copy of the sysinternal Sdelete tool and use it to zero the deleted files on the disk. This step is not essential but you will get better results if you do it.  I would recommend skipping this step if you are using an SSD on a physical machine.

https://technet.microsoft.com/en-us/sysinternals/bb897443.aspx

This command assumes you are on the machine you want to shrink:

C:\pathtofile\sdelete.exe -s -z c:

sdelete in progress

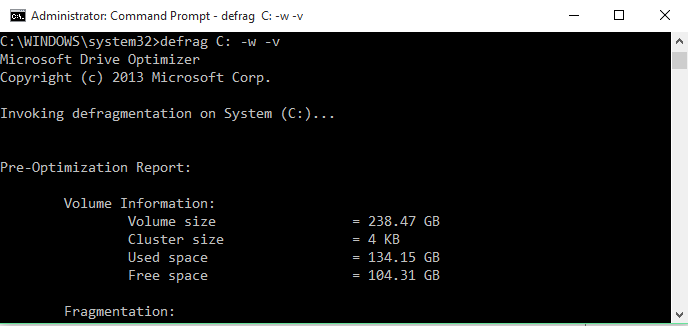
3.  Defragment the disk. You can run this from within the guest OS but you may get better results shutting down the VM and mounting the VHDX file on another system. This way all the files can be defragmented.

defrag C: -w –v

defrag command screenshot

4.  Consider shrinking the partition. It maybe if you are making a template you want to keep a large partition as you expect and want the VHDX to grow after it is deployed. (If that is the case skip this step) If you are looking for a more permanent shrink then you should now shrink the partition to the desired size. This is best accomplished in the disk management GUI or with PowerShell.

This assumes you only have one local disk and know the size you want to resize to, if this isn’t the case use get-partition to work out the correct numbers for your situation and use Get-PartitionSupportedSize to view the possible sizes you could shrink to.

Resize-Partition -DiskNumber 1 -PartitionNumber 1 –size 30GB 5.  Now use the Hyper-V, VMM or failover cluster manager GUI to compact the VHD.

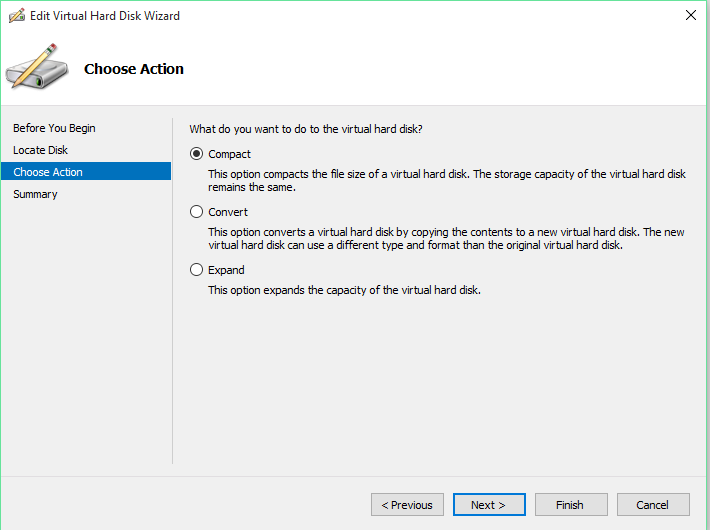
5.  Compact the VHDX.  The quickest method is to use the Hyper-V, VMM or failover cluster manager GUI to compact the VHD.  e.g. right click on the VM>Select settings>Left click on the disk>click “Edit”>Click “Next”>Select “Compact”>Click “Next”>Review the change summary screen and click on “Finish.”  This might take some time if there is a lot to shrink.  The VM also needs to be powered off for this final step.

Compact VHDX settings screen

Happy shrinking!

PowerShell script to setup SNMP

It is a bit old school and most people will be using something more modern and feature reach like SCOM or PRTG for monitoring but SNMP still enjoys just about the widest support and can be great for agentless monitoring from free/cheap tools such as observium or nagios.

Here is a script I use to automatically install and configure SNMP on windows servers where we want to use SNMP monitoring.

$pollers = @(“Observium”,”10.10.5.4″,”prtg01″) # Edit this to contain your SNMP Pollers (IP or DNS name) so it looks like this @(“monitorserv1″,”10.10.5.2”)
$CommunityStr = @(“Priv176c0m”) # Edit this to contain your community strings so it looks like this @(“Secretcommunity”,”private2″)

Import-Module ServerManager

#test if SNMP-Service Feature is enabled
$test = Get-WindowsFeature -Name SNMP-Service

#Install/Enable SNMP-Service if it is not enabled
If ($test.Installed -ne “True”) {
Write-Host “Enabling SNMP-Service Feature”
Get-WindowsFeature -name SNMP* | Add-WindowsFeature -IncludeManagementTools | Out-Null
}

#re-test if SNMP-Service Feature is enabled and update variable
$test = Get-WindowsFeature -Name SNMP-Service

#Setup reg keys to configure SNMP-Service if Feature is Enabled
If ($test.Installed -eq “True”){
Write-Host “Configuring SNMP-Services with your Community strings and Permitted pollers”
reg add “HKEY_LOCAL_MACHINE\SYSTEM\CurrentControlSet\services\SNMP\Parameters\PermittedManagers” /v 1 /t REG_SZ /d localhost /f | Out-Null

Foreach ($String in $CommunityStr){
reg add (“HKEY_LOCAL_MACHINE\SYSTEM\CurrentControlSet\services\SNMP\Parameters\TrapConfiguration\” + $String) /f | Out-Null
reg delete (“HKEY_LOCAL_MACHINE\SYSTEM\CurrentControlSet\services\SNMP\Parameters\TrapConfiguration\” + $String) /ve /f | Out-Null
reg add “HKEY_LOCAL_MACHINE\SYSTEM\CurrentControlSet\services\SNMP\Parameters\ValidCommunities” /v $String /t REG_DWORD /d 4 /f | Out-Null
$i = 2

Foreach ($Manager in $pollers){
reg add “HKEY_LOCAL_MACHINE\SYSTEM\CurrentControlSet\services\SNMP\Parameters\PermittedManagers” /v $i /t REG_SZ /d $manager /f | Out-Null
reg add (“HKEY_LOCAL_MACHINE\SYSTEM\CurrentControlSet\services\SNMP\Parameters\TrapConfiguration\” + $String) /v $i /t REG_SZ /d $manager /f | Out-Null
$i++
}
}
}
Else {
Write-Host “Error: SNMP Setup did not complete”
}

Click Enable-SNMP.ps1 to download this as a text file.