List of feature names in DISM

The feature names in DISM are a bit different to those in PowerShell.  You can see what they are from a booted computer with the following command:

dism /online /get-features

However I find it useful to keep a searchable list around as it is faster to use to try and remember/work out what that feature is actually called when you are trying to add it to a wim file or computers and the install-windowsfeature is not working for you.

Here is a list of all features from an up to date 2012 R2 Standard computer:

Feature Name : NetFx4ServerFeatures
Feature Name : NetFx4
Feature Name : NetFx4Extended-ASPNET45
Feature Name : MicrosoftWindowsPowerShellRoot
Feature Name : MicrosoftWindowsPowerShell
Feature Name : ServerCore-FullServer
Feature Name : IIS-WebServerRole
Feature Name : IIS-WebServer
Feature Name : IIS-CommonHttpFeatures
Feature Name : IIS-Security
Feature Name : IIS-RequestFiltering
Feature Name : IIS-StaticContent
Feature Name : IIS-DefaultDocument
Feature Name : IIS-DirectoryBrowsing
Feature Name : IIS-HttpErrors
Feature Name : IIS-HttpRedirect
Feature Name : IIS-WebDAV
Feature Name : IIS-ApplicationDevelopment
Feature Name : IIS-WebSockets
Feature Name : IIS-ApplicationInit
Feature Name : IIS-NetFxExtensibility
Feature Name : IIS-NetFxExtensibility45
Feature Name : IIS-ISAPIExtensions
Feature Name : IIS-ISAPIFilter
Feature Name : IIS-ASPNET
Feature Name : IIS-ASPNET45
Feature Name : IIS-ASP
Feature Name : IIS-CGI
Feature Name : IIS-ServerSideIncludes
Feature Name : IIS-HealthAndDiagnostics
Feature Name : IIS-HttpLogging
Feature Name : IIS-LoggingLibraries
Feature Name : IIS-RequestMonitor
Feature Name : IIS-HttpTracing
Feature Name : IIS-CustomLogging
Feature Name : IIS-ODBCLogging
Feature Name : IIS-CertProvider
Feature Name : IIS-BasicAuthentication
Feature Name : IIS-WindowsAuthentication
Feature Name : IIS-DigestAuthentication
Feature Name : IIS-ClientCertificateMappingAuthentication
Feature Name : IIS-IISCertificateMappingAuthentication
Feature Name : IIS-URLAuthorization
Feature Name : IIS-IPSecurity
Feature Name : IIS-Performance
Feature Name : IIS-HttpCompressionStatic
Feature Name : IIS-HttpCompressionDynamic
Feature Name : IIS-WebServerManagementTools
Feature Name : IIS-ManagementConsole
Feature Name : IIS-LegacySnapIn
Feature Name : IIS-ManagementScriptingTools
Feature Name : IIS-ManagementService
Feature Name : IIS-IIS6ManagementCompatibility
Feature Name : IIS-Metabase
Feature Name : IIS-WMICompatibility
Feature Name : IIS-LegacyScripts
Feature Name : IIS-FTPServer
Feature Name : IIS-FTPSvc
Feature Name : IIS-FTPExtensibility
Feature Name : WAS-WindowsActivationService
Feature Name : WAS-ProcessModel
Feature Name : WAS-NetFxEnvironment
Feature Name : WAS-ConfigurationAPI
Feature Name : IIS-HostableWebCore
Feature Name : BITSExtensions-AdminPack
Feature Name : Gateway-UI
Feature Name : MSMQ
Feature Name : MSMQ-Services
Feature Name : MSMQ-Server
Feature Name : MSMQ-Triggers
Feature Name : MSMQ-ADIntegration
Feature Name : MSMQ-HTTP
Feature Name : MSMQ-Multicast
Feature Name : MSMQ-DCOMProxy
Feature Name : MSMQ-RoutingServer
Feature Name : WCF-Services45
Feature Name : WCF-HTTP-Activation45
Feature Name : WCF-TCP-Activation45
Feature Name : WCF-Pipe-Activation45
Feature Name : WCF-MSMQ-Activation45
Feature Name : WCF-TCP-PortSharing45
Feature Name : ManagementOdata
Feature Name : DSC-Service
Feature Name : IdentityServer-SecurityTokenService
Feature Name : Application-Server
Feature Name : AS-NET-Framework
Feature Name : Application-Server-WebServer-Support
Feature Name : AS-Ent-Services
Feature Name : Application-Server-TCP-Port-Sharing
Feature Name : Application-Server-WAS-Support
Feature Name : Application-Server-HTTP-Activation
Feature Name : Application-Server-MSMQ-Activation
Feature Name : Application-Server-TCP-Activation
Feature Name : Application-Server-Pipe-Activation
Feature Name : AS-Dist-Transaction
Feature Name : AS-Incoming-Trans
Feature Name : AS-Outgoing-Trans
Feature Name : AS-WS-Atomic
Feature Name : ADCertificateServicesRole
Feature Name : CertificateServices
Feature Name : OnlineRevocationServices
Feature Name : WebEnrollmentServices
Feature Name : NetworkDeviceEnrollmentServices
Feature Name : CertificateEnrollmentPolicyServer
Feature Name : CertificateEnrollmentServer
Feature Name : Web-Application-Proxy
Feature Name : IPAMServerFeature
Feature Name : RightsManagementServices-Role
Feature Name : RightsManagementServices
Feature Name : RMS-Federation
Feature Name : RightsManagementServices-AdminTools
Feature Name : WSS-Product-Package
Feature Name : BITSExtensions-Upload
Feature Name : Printing-Server-Foundation-Features
Feature Name : Printing-Server-Role
Feature Name : Printing-LPDPrintService
Feature Name : BusScan-ScanServer
Feature Name : Printing-InternetPrinting-Server
Feature Name : HCAP-Server
Feature Name : HCSRuntime
Feature Name : RemoteAccess
Feature Name : RemoteAccessServer
Feature Name : RasRoutingProtocols
Feature Name : WCF-HTTP-Activation
Feature Name : WCF-NonHTTP-Activation
Feature Name : WindowsPowerShellWebAccess
Feature Name : RPC-HTTP_Proxy
Feature Name : Smtpsvc-Admin-Update-Name
Feature Name : Smtpsvc-Service-Update-Name
Feature Name : Gateway
Feature Name : WebAccess
Feature Name : Microsoft-Windows-Web-Services-for-Management-IIS-Extension
Feature Name : WorkFolders-Server
Feature Name : UpdateServices
Feature Name : UpdateServices-Services
Feature Name : UpdateServices-Database
Feature Name : UpdateServices-WidDatabase
Feature Name : Microsoft-Windows-Deployment-Services
Feature Name : Microsoft-Windows-Deployment-Services-Deployment-Server
Feature Name : Microsoft-Windows-Deployment-Services-Transport-Server
Feature Name : Microsoft-Windows-Deployment-Services-Legacy-SIS
Feature Name : BitLocker
Feature Name : Bitlocker-Utilities
Feature Name : BitLocker-NetworkUnlock
Feature Name : User-Interfaces-Infra
Feature Name : Server-Gui-Mgmt
Feature Name : RSAT
Feature Name : CoreFileServer-RSAT
Feature Name : Server-Manager-RSAT-File-Services
Feature Name : Server-RSAT-SNMP
Feature Name : DNS-Server-Tools
Feature Name : IPAMClientFeature
Feature Name : WINS-Server-Tools
Feature Name : DfsMgmt
Feature Name : ADCertificateServicesManagementTools
Feature Name : CertificateServicesManagementTools
Feature Name : OnlineRevocationServicesManagementTools
Feature Name : RSAT-AD-Tools-Feature
Feature Name : RSAT-ADDS-Tools-Feature
Feature Name : DirectoryServices-DomainController-Tools
Feature Name : DirectoryServices-ADAM-Tools
Feature Name : BitLocker-RemoteAdminTool
Feature Name : BdeAducExtTool
Feature Name : ActiveDirectory-PowerShell
Feature Name : DirectoryServices-DomainController
Feature Name : DirectoryServices-ISM-Smtp
Feature Name : DirectoryServices-AdministrativeCenter
Feature Name : RasServerAdminTools
Feature Name : DamgmtTools
Feature Name : HCSUI
Feature Name : Licensing-UI
Feature Name : Licensing-Diagnosis-UI
Feature Name : Microsoft-Windows-Deployment-Services-Admin-Pack
Feature Name : DHCPServer-Tools
Feature Name : FailoverCluster-Mgmt
Feature Name : NetworkLoadBalancingManagementClient
Feature Name : NFS-Administration
Feature Name : UpdateServices-UI
Feature Name : WindowsServerBackupSnapin
Feature Name : FaxServiceConfigRole
Feature Name : NPSManagementTools
Feature Name : RightsManagementServicesManagementTools
Feature Name : Security-SPP-Vmw
Feature Name : FSRM-Infrastructure
Feature Name : FSRM-Management
Feature Name : Microsoft-Windows-FCI-Client-Package
Feature Name : Printing-Client
Feature Name : Printing-Client-Gui
Feature Name : RSAT-NIS
Feature Name : MicrosoftWindowsPowerShellISE
Feature Name : Microsoft-Hyper-V
Feature Name : Microsoft-Hyper-V-Offline
Feature Name : Microsoft-Hyper-V-Online
Feature Name : RSAT-Hyper-V-Tools-Feature
Feature Name : Microsoft-Hyper-V-Management-Clients
Feature Name : Microsoft-Hyper-V-Management-PowerShell
Feature Name : VmHostAgent
Feature Name : Server-Gui-Shell
Feature Name : Internet-Explorer-Optional-amd64
Feature Name : FaxServiceRole
Feature Name : ServicesForNFS-ServerAndClient
Feature Name : ServerForNFS-Infrastructure
Feature Name : ClientForNFS-Infrastructure
Feature Name : SearchEngine-Server-Package
Feature Name : FSRM-Infrastructure-Services
Feature Name : NPAS-Role
Feature Name : IAS NT Service
Feature Name : iSCSITargetServer-PowerShell
Feature Name : OEM-Appliance-OOBE
Feature Name : PSync
Feature Name : AppServer
Feature Name : Microsoft-Windows-ServerEssentials-ServerSetup
Feature Name : PKIClient-PSH-Cmdlets
Feature Name : KeyDistributionService-PSH-Cmdlets
Feature Name : TlsSessionTicketKey-PSH-Cmdlets
Feature Name : RemoteAccessMgmtTools
Feature Name : RemoteAccessPowerShell
Feature Name : MicrosoftWindowsPowerShellV2
Feature Name : Server-Psh-Cmdlets
Feature Name : UpdateServices-RSAT
Feature Name : UpdateServices-API
Feature Name : DirectoryServices-ADAM
Feature Name : AuthManager
Feature Name : ServerCore-WOW64
Feature Name : ServerCore-EA-IME-WOW64
Feature Name : LegacyComponents
Feature Name : DirectPlay
Feature Name : Windows-Identity-Foundation
Feature Name : SimpleTCP
Feature Name : Printing-LPRPortMonitor
Feature Name : Printing-InternetPrinting-Client
Feature Name : Printing-AdminTools-Collection
Feature Name : ServerManager-Core-RSAT
Feature Name : ServerManager-Core-RSAT-Role-Tools
Feature Name : ServerManager-Core-RSAT-Feature-Tools
Feature Name : NetFx3ServerFeatures
Feature Name : NetFx3
Feature Name : EnhancedStorage
Feature Name : Microsoft-Windows-GroupPolicy-ServerAdminTools-Update
Feature Name : RasCMAK
Feature Name : RSAT-RDS-Tools-Feature
Feature Name : FailoverCluster-AdminPak
Feature Name : FailoverCluster-PowerShell
Feature Name : AdminUI
Feature Name : BiometricFramework
Feature Name : WindowsServerBackup
Feature Name : WindowsFeedbackForwarder
Feature Name : FileAndStorage-Services
Feature Name : Storage-Services
Feature Name : File-Services
Feature Name : CoreFileServer
Feature Name : File-Services-Search-Service
Feature Name : DFSN-Server
Feature Name : DFSR-Infrastructure-ServerEdition
Feature Name : FileServerVSSAgent
Feature Name : iSCSITargetServer
Feature Name : SMBHashGeneration
Feature Name : Dedup-Core
Feature Name : DHCPServer
Feature Name : DNS-Server-Full-Role
Feature Name : FailoverCluster-AutomationServer
Feature Name : FailoverCluster-CmdInterface
Feature Name : FRS-Infrastructure
Feature Name : Windows-Internal-Database
Feature Name : WINSRuntime
Feature Name : iSCSITargetStorageProviders
Feature Name : iSNS_Service
Feature Name : BITS
Feature Name : LightweightServer
Feature Name : MultipathIo
Feature Name : NetworkLoadBalancingFullServer
Feature Name : NIS
Feature Name : PeerDist
Feature Name : P2P-PnrpOnly
Feature Name : Printing-XPSServices-Features
Feature Name : QWAVE
Feature Name : MSRDC-Infrastructure
Feature Name : RemoteAssistance
Feature Name : ServerCore-EA-IME
Feature Name : DataCenterBridging
Feature Name : ServerMediaFoundation
Feature Name : InkAndHandwritingServices
Feature Name : DesktopExperience
Feature Name : MediaPlayback
Feature Name : WindowsMediaPlayer
Feature Name : ServerMigration
Feature Name : ServerCore-Drivers-General
Feature Name : Server-Drivers-General
Feature Name : Server-Drivers-Printers
Feature Name : SIS-Limited
Feature Name : SmbDirect
Feature Name : SNMP
Feature Name : WMISnmpProvider
Feature Name : WindowsStorageManagementService
Feature Name : TelnetClient
Feature Name : TelnetServer
Feature Name : Remote-Desktop-Services
Feature Name : SessionDirectory
Feature Name : SBMgr-UI
Feature Name : Licensing
Feature Name : TFTP
Feature Name : VolumeActivation-Full-Role
Feature Name : TIFFIFilter
Feature Name : WirelessNetworking
Feature Name : Xps-Foundation-Xps-Viewer
Feature Name : SMB1Protocol
Feature Name : SMBBW
Feature Name : FailoverCluster-FullServer
Feature Name : CCFFilter
Feature Name : ResumeKeyFilter
Feature Name : SmbWitness

List windows updates or Hotfixes installed after a certain date

Ever found something broken and wondered what updates have been installed since a certain point in the past?

PS C:\Users\robin> Get-HotFix | ? installedon -gt 06/09/2015

Source        Description      HotFixID      InstalledBy          InstalledOn
——        ———–      ——–      ———–          ———–
Mxxxxx    Update           KB2693643     NT AUTHORITY\SYSTEM  09/07/2015…

Viewing and Deleting elasticsearch indexes

Generally I find it easiest to view the indexes on box by sending a command with curl.

for example this will list every index:

curl http://localhost:9200/_aliases

Unfortunately it lists it in a big block of text, to see it formatted in a nicer way try:

curl http://localhost:9200/_aliases?pretty=1

Now lets say for example you want to delete just one index. That can also easily be done with curl.

e.g.

curl -XDELETE localhost:9200/2015.06.01

Where everything after the / is your index name.  If this works you should have a response from the server of:

{“acknowledged”:true}

If you mistype or the index is already gone you might see this returned:

{“error”:”IndexMissingException[[bacon] missing]”,”status”:404}

Check the name issues and maybe list all the indexes again so you can be sure they aren’t already gone or you have the wrong name.

You can also use wildcards to delete similarly named indexes. So if for example I wanted to delete all the June indexes I could issue this command:

curl -XDELETE localhost:9200/2015.06*

One gotcha with the wildcard is that you always seem to get a response of {“acknowledged”:true} even if you give a name and wildcard that matches nothing, so make sure you have the right name and to check the indexes after issuing the command.

Cannot deploy Virtual Machines via App controller or virtual machine manager

I found myself unable to deploy Virtual Machine templates via App controller or virtual machine manager.  The detailed error was available when attempting via VMM and stated:

“The projected CPU utilization exceeds the CPU utilization of 0% specified at the host reserve level”

All the hosts had zero stars and I couldn’t continue.  Normally this is a useful message as it is preventing me from putting too many virtual machines on my hosts and stretching them too far, however in this instance I knew that we should be OK – we need to have 50 or so VMs on each host and they don’t use much CPU.  It was possible to manually make more virtual machine in hyper-v and then manage them post deployment in VMM but that defeats the point of having a scripted template deployment and app controller setup so users can deploy their own Test VMs?

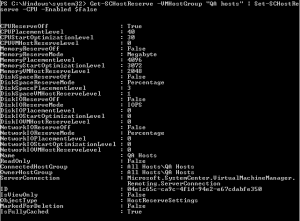
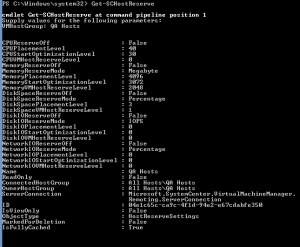
I found that there is a somewhat hidden option in the host reserve settings available only in PowerShell.  You can have a look at what yours are configured to use with the Get-SCHostReserve” PowerShell command.  The setting you need to change to bypass CPU reserves is the “CPUReserveOff” parameter.

get-schostreserve

So as you can see I have my CPU reserve level set to 0% but when VMM evaluates the deployment if it believes there will be less than 0% CPU available it says no.

You can change this with the Set-SCHostReserve command.

Get-SCHostReserve -VMHostGroup “your host group here” | Set-SCHostReserve -CPU -Enabled $false

fix-get-schostreserve

“The projected CPU utilization exceeds the CPU utilization of 0% specified at the host reserve level” but it lets you continue and deploy anyway.


Delegate rights to unlock accounts in AD

To delegate the right right to unlock user accounts in ADUC:

Right-click the OU or domain in Active Directory Users and Computers and select Delegate Control from the context menu
Click Next on the Welcome dialog
Click Add to select the user or group and click OK
Click Next
Select Create a custom task to delegate and click Next
Select Only the following objects in the folder. In the list, check User objects and click Next
Clear the General checkbox and check the Property-specific box
Check both the Read lockoutTime and Write lockoutTime boxes and press Next
Click Finish

Monitoring and managing an Ubuntu Linux server in System Center Operations Manager 2012 R2

First we need to make sure we have a “run-as” account setup in SCOM for Linux machines.  You can find this in Administration>UNIX/Linux account and “Create Run As Account”  This account does not need to be the same as the account you use to discover and install the agent however in a lab or simple environment you might choose to make it the same account.

Next we need to create a local account for SCOM to install deploy the agent and manage the Ubuntu machine.  This might be the same username and password you used for your “run-as” account but doesn’t have to be.  Log on to your Ubuntu server and run the following command and follow the on screen prompts to create a password.

sudo adduser scomaccount

Now we need to let this account use sudo with no password.  So do this run:

visudo

add this line to the very bottom of the file and then save and exit.

scomacc ALL=(ALL) NOPASSWD:ALL

Before running the discovery wizard in SCOM check both forward and reverse DNS lookups for your ubuntu server work correctly, for example the following commands run on your SCOM server should return the name and IP address.  You will get an error if these addresses are wrong.

nslookup linux server

nslookup 10.0.4.56

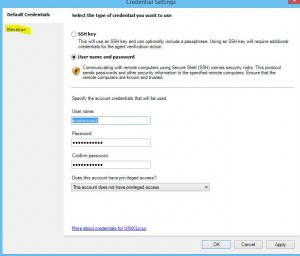
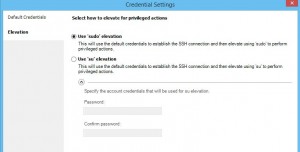
When running the discovery wizard enter the account details you setup above, but make sure to select the account is not privileged and that it needs sudo elevation but leave the password blank in the elevation section.

scom account 1

scom account 2

You should now be ready to click on discover tick the server and then click on manage.  If your Linux machine has only a single name host name you will likely see a certificate error.  To fix this either change the host name on your Linux box to be the correct FQDN or manually create a new certificate with the command below on your Ubuntu server:

/opt/microsoft/scx/bin/tools/scxsslconfig –h linuxserver01 –d yourdomain.com -f –v

where linusserver01 is your hostname and yourdomain.com is the fully qualified domain name that your Linux server resolves to in DNS.  Once this has been run you should be able to click back and then on manage again and it will retry.  If all is well you should see the below.

scom success

Office 365 Lync / Skype for business users wont provision when you come from an on premises setup

Usually when adding a new 365 user to lync it is as simple as assigning the license and before long they automatically deploy.  In some situations when you are running an on premises install of lync and have setup dirsync users never provision.  This is true even when you have disabled them in the lync console.

It appears that the cloud based lync will not provision users if they are still setup on premises or have some lync related attributes set.  This makes sense as if you have setup users in the portal and licensed them you might not want them to all end up in lync 365 right away.

To get these users objects provisioning simply disable Lync for user on the in premises lync server control panel then clear/not set these attributes:

> msRTCSIP-DeploymentLocator
> msRTCSIP-FederationEnabled
> msRTCSIP-InternetAccessEnabled
> msRTCSIP-Line
> msRTCSIP-OptionFlags
> msRTCSIP-PrimaryHomeServer
> msRTCSIP-PrimaryUserAddress
> msRTCSIP-UserEnabled
> msRTCSIP-UserPolicies

Double check the user is licensed for Lync option 2.  Soon they should appear on the lync portal and be able to sign in.  (Assuming you have setup your DNS/Auto discover.

Task Sequence failed with error code 0x8000FFFF when deploying

When running a task sequence to deploy an operating system I received the above error which doesn’t give much away.  Reviewing the SMSts.log file there are a number of errors, all pointing to a problem partitioning the disk.

Partition 2 larger than remaining disk space. Requested partition size: 12737418240, remaining size: 11733401760.

Invalid configuration specified.  Please ensure that the task sequence is properly configured.

OSDDiskPart.exe failed: 0x8000ffff

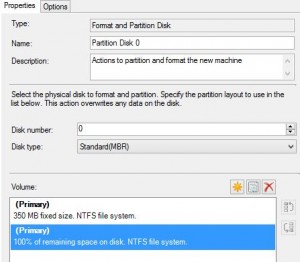
Within the task sequence the partition step was configured to create a fixed partition size which was too large to fit on the disk.  Simply edit this step so that it uses 100% of the remaining disk space – your solution may vary from this depending on what you are trying to do with your partitions but in short this is where you need to focus your attention.

partition set to 100%

SCCM Device Collection WMI Query for computers with IIS installed

If you are looking to dynamically filter a device collection so that only machines with the IIS role enabled are included try using the query below.

select SMS_R_System.ResourceId, SMS_R_System.ResourceType, SMS_R_System.Name, SMS_R_System.SMSUniqueIdentifier, SMS_R_System.ResourceDomainORWorkgroup, SMS_R_System.Client from  SMS_R_System inner join SMS_G_System_SERVICE on SMS_G_System_SERVICE.ResourceID = SMS_R_System.ResourceId where SMS_G_System_SERVICE.Name = “W3SVC”

Don’t forget you can either limit this device collection to another or create another and limit it to this collection to filter further – e.g. Windows 2012 servers with IIS installed.

How to rebuild an SCCM PXE boot point

If your SCCM PXE boot point is failing and machines are showing errors such as:

PXE-04 access violation
RXE-04 error

or various other errors it may be necessary to remove and re-install the features to repair it.  The steps below should achieve this.

  1. Open the Configuration Manager console and navigate to Administration > Distribution points and right click on the server you run PXE on and select properties. Then navigate to the PXE tab and untick the enable PXE checkbox on the distribution point. Answer yes that you want to remove the Windows Deployment service.
  2. Next, navigate to Software library > boot images. Right click on each of your boot images and go to the “Content Locations” tab and remove them from this server.
  3. Check c:\Program Files\Microsoft Configuration Manager\Logs\distmgr.log and wait for it to say the WDS role has been removed. IF you are able to check the roles and features in server manager it should also say there is a restart pending.
  4. Delete the contents of your %windir%\temp directory and then restart.
  5. Check for a remoteinstall folder – this maybe on any drive – if it is still there delete it completely.
  6. Navigate back to Administration > Distribution points and right click on the server you run PXE on and select properties. Then navigate to the PXE tab and this time tick the enable PXE checkbox on the distribution point. Answer yes that you want to install the Windows Deployment service.
  7. Again monitor your distmgr.log and the server manager you should see entries similar to below: (And another pending restart)

WDS is NOT INSTALLED~ $$<SMS_DISTRIBUTION_MANAGER><04-10-2015 09:58:06.938-60><thread=3992 (0xF98)>
Installing WDS.~ $$<SMS_DISTRIBUTION_MANAGER><04-10-2015 09:58:06.938-60><thread=3992 (0xF98)>
Running: ServerManagerCmd.exe -i WDS -a~ $$<SMS_DISTRIBUTION_MANAGER><04-10-2015 09:58:06.938-60><thread=3992 (0xF98)>
Failed (2) to run: ServerManagerCmd.exe -i WDS -a~ $$<SMS_DISTRIBUTION_MANAGER><04-10-2015 09:58:06.938-60><thread=3992 (0xF98)>
Running: PowerShell.exe -Command Import-Module ServerManager; Get-WindowsFeature WDS; Add-WindowsFeature WDS~ $$<SMS_DISTRIBUTION_MANAGER><04-10-2015 09:58:06.938-60><thread=3992 (0xF98)>
Waiting for the completion of: PowerShell.exe -Command Import-Module ServerManager; Get-WindowsFeature WDS; Add-WindowsFeature WDS~ $$<SMS_DISTRIBUTION_MANAGER><04-10-2015 09:58:06.953-60><thread=3992 (0xF98)>
Sleep 30 minutes… $$<SMS_DISTRIBUTION_MANAGER><04-10-2015 09:58:07.485-60><thread=1636 (0x664)>
Run completed for: PowerShell.exe -Command Import-Module ServerManager; Get-WindowsFeature WDS; Add-WindowsFeature WDS~ $$<SMS_DISTRIBUTION_MANAGER><04-10-2015 09:58:10.000-60><thread=3992 (0xF98)>
Successfully installed WDS.~ $$<SMS_DISTRIBUTION_MANAGER><04-10-2015 09:58:10.000-60><thread=3992 (0xF98)>
Failed to open WDS service.~ $$<SMS_DISTRIBUTION_MANAGER><04-10-2015 09:58:10.000-60><thread=3992 (0xF98)>
WDS is NOT INSTALLED~ $$<SMS_DISTRIBUTION_MANAGER><04-10-2015 09:58:10.000-60><thread=3992 (0xF98)>
WDS is not installed. Cannot configure PXE server to use WDS~ $$<SMS_DISTRIBUTION_MANAGER><04-10-2015 09:58:10.000-60><thread=3992 (0xF98)>

  1. If you see a pending restart – reboot the server.
  2. Again – navigate to one of your boot images and make a small change which will require the wim to be opened and edited. For example add a new small optional component or set a background image and follow the wizard to update the WIM.
  3. Distribute the wim to your PXE boot server.
  4. Repeat this for all your boot images – there should be at least one x86 and one x64 image.
  5. The distmgr.log should be full of encouraging entries if all is well the windows distribution service will have started and be working.
  6. Attempt a PXE boot.

The above is all that should be required to rebuild the PXE/WDS components. Depending on what has broken and why you are doing this you may also need to remove and re-add the management point. Check your logs for more information. Also don’t forget options 66 and 67 in DHCP and/or IP Helpers as required. Checking Wireshark or netmon on your SCCM PXE boot server should let you know if the traffic is getting to the right place.