WSUSpool keeps stopping and console shows reset node

I recently found myself in a situation where WSUS would only work for a few minutes or even seconds at a time. A restart or IISReset could bring it back for a few minutes but it would soon stop again. The Configuration manager console didn’t show any errors but it also could not see any new updates.

The event log contained this message:

The WSUS administration console was unable to connect to the WSUS Server via the remote API.

Eventually the fix was to increase the amount of memory avaliable to the app pool from the default 1843200 KB – you could set this to 0 so there is no limit or to a higher sensible limit. After doing this and running an IISRESET the app pool remained running and I was able to syncronize new updates as well as service updates to clients.

To do this open up IIS and click the plus by your servername, then on “Application pools”. Next right click on WsusPool and then left click on “Advanced Settings”, then scroll down and locate the “Private Memory limit (KB)” near the bottom and edit this value to 0 or something higher.

List windows updates or Hotfixes installed after a certain date

Ever found something broken and wondered what updates have been installed since a certain point in the past?

PS C:\Users\robin> Get-HotFix | ? installedon -gt 06/09/2015

Source        Description      HotFixID      InstalledBy          InstalledOn
——        ———–      ——–      ———–          ———–
Mxxxxx    Update           KB2693643     NT AUTHORITY\SYSTEM  09/07/2015…

User Profile Service service failed the logon. User profile cannot be loaded

Most people who work in a windows environment for some time will have seen profile corruption before where a single user cannot log in or looses settings with the fix often being to log on as someone else and remove the profile completely allowing a new working profile to be created or restoring from a backup.  But what about when no one can log in including new users?  I recently came across this problem where a server gave everyone who attempted to log in, including new users a “User Profile Service service failed the log in. User profile cannot be loaded” message.

Profile error message

Everything else was working correctly, I could remotely stop and start services, browse administrative shares and even open the registry.  The culprit turned out to be bad permissions on the default user profile.
To fix, make sure you have turned on show hidden files and folders and also unticked “Hide protected operating system files” on the computer you are connecting from.

unhide files and folders

Next, browse to the administrative C: drive share on the computer which fails all log ons:  \\computername\c$\users\ and right click on “default” and then on “properties”

Next click on the “Security” tab at the top and then on the “advanced” button at the bottom. (You should see the window below)

Advanced Permissions

Next, click on “Change permissions” and then tick the box next to “Replace all child object permissions with inheritable permissions from this object” and then on OK.  This should re-apply the permissions on this folder and permit profiles to be re-created again.

replace child permissions with inheritable

SharePoint management shell commands fail with access denied when using run-as

I often log on with a non privileged account and then execute individual applications or scripts as a privileged account using the “run as” feature found in windows.  Unfortunately it seems with the sharepoint management shell that this often fails with access denied.


error message

First double check you are sure the account your using is correct, is in the farm administrators group and has shell access (try Get-SPShellAdmin and if you don’t have it get a user who is a shell admin to add you with Add-SPShellAdmin with no database specified.)

I found that actually logging on as the privileged user worked around the error.  It is a shame as it means working interactively as an admin which always introduces a little bit of risk and I personally like the safety net of having to explicitly run something as admin if I want to make changes.

No error message


Notice the change in background colour and the window title when run directly instead of with the run as option.

KDC Authentication problems with 2003 to 2008 domain functional level

Recently I have had problems connecting to the console on a number of 2008 R2 Hyper-v guest virtual machines.  The error was “An Authentication Error Has Occurred.  The Encryption Type Requested Is not supported by the KDC” while I have also had a single Exchange 2010 server fail with the following event IDs: 2102, 2103, 2114, 9106 all reporting LDAP problems, non-responding domain controllers and global catalogs:

Process MSEXCHANGEADTOPOLOGYSERVICE.EXE (PID=1696). Topology discovery failed, error 0×80040952 (LDAP_LOCAL_ERROR (Client-side internal error or bad LDAP message)). Look up the Lightweight Directory Access Protocol (LDAP) error code specified in the event description. To do this, use Microsoft Knowledge Base article 218185, “Microsoft LDAP Error Codes.” Use the information in that article to learn more about the cause and resolution to this error. Use the Ping or PathPing command-line tools to test network connectivity to local domain controllers.

Process STORE.EXE (PID=4084). All Global Catalog Servers in forest DC=xxx,DC=xx,DC=xx are not responding:

Process STORE.EXE (PID=4084). All Domain Controller Servers in use are not responding:

Attempting to open the Exchange management console on the local server console ended with a  HTTP server error status 500 and “Kerberos” authentication failed.

The Exchange server was able to ping and resolve all DNS names correctly and the problem went away on restarting only to re-occur in 24 hours or so.

The rather simple resolution in the end turned out to be restarting the “KERBEROS DISTRIBUTION KEY (KDC) service” on all Domain controllers.  While Restarting all Domain controllers in their entirety is also a good idea it isn’t always possible (or desirable) on a live production environment.

System Centre Operations Manager Release Candidate Setup

Following on from the unified installer for the Microsoft private cloud, the System centre operations manager installation failed and I decided to attempt the installation myself.

Once you have a suitable server setup with windows 2008 R2 the first step is to install the .NET Framework 4, report viewer and all the required IIS roles:

IIS6 Metabase Compatibility role service.
ASP.NET role service.
Windows Authentication role service.
Static Content role service.
Default Document role service.
Directory Browsing role service.
HTTP Errors role service.
HTTP Logging role service.
Request Monitor role service.
Request Filtering role service.
Static Content Compression role service
IIS Management Console role service.

Even with all the correct roles and pre-requisit software installed the validator will still throw up a couple of problems.


You will need to load the IIS Manager and open the ISAPI and CGI Restrictions properties and change the deny to an allow for the ASP.NET v4.0.30319 line.


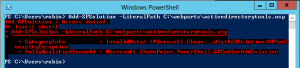
In addition to the above if you installed the .NET 4 framework before the roles you will get an error message: “The ISAPI and CGI Restrictions are disabled or missing” on validating the pre-requisites and will need to run the following command in a cmd window to resolve the problem.

%WINDIR%\Microsoft.NET\Framework64\v4.0.30319\aspnet_regiis.exe –r

If all is well the command window should look like this:


Now setup should allow you to proceed with setup and select weather to add a management server to an existing management group or create the first management server in a new management group.  I like most people playing with the release candidate chose the latter.

Next you are prompted to supply the SQL server details.  In my environment the failed unified installer attempt had left a default SQL instance installed which appeared to be unsuitable as the installer complained I was missing the “Full text indexing” features required.  I had used the SQL 2008 R2 express media which does not include this option (and according to tech-net not on the list of supported SQL versions) so my next steps were to remove the currently installed SQL instance and install a full fat version of SQL 2008 R2 Standard with the full text indexing and reporting services options.  In a production setup you may well choose to create a new database on an existing server but for the purposes of evaluating this I selected to have a local instance of SQL installed as it makes cleaning up this install later a lot easier as I can just destroy the VM.

With the advanced services options installed the operations manager setup wizard will allow you to continue and adjust the configuration of the operational database (although I just left these at the defaults)


On clicking next you should see a similar screen for the datawarehouse database.  Again I accepted the defaults and continued on to choose the reporting services instance I installed earlier with SQL 2008 R2 Standard (don’t forget to run the Reporting Services configuration manager and start the SQL Server agent service)


Next it is time to choose which IIS site to use for the web console.  In a production environment it would be prudent to configure a new site and setup SSL however I am sticking with the default website for now.


Next you are prompted to select an authentication mode for use with the web console.  I selected Mixed Authentication as it will be an entirely private deployment for evaluation/testing purposes only.

After selecting the authentication mode you are prompted to supply some domain account/s for the various roles to use.  I created a single user for this purpose however it would be advisable to separate the data and management accounts so you can fine tune the permissions they are granted.


After this step you can choose to opt-in (or not) to the various customer experience improvement programs.  I chose not to as this machine has no Internet access anyway.

Finally you are presented with a page full of the various configuration options set in the previous steps.  If all looks well click install, go grab a tea/coffee and you should be able to return to an installed SCOM 2012.


Next I will work on getting a few servers monitored and start evaulating what is avaliable in SCOM 2012.

Evaluating the Microsoft Private Cloud with the System Centre 2012 Unified Installer

After reading a lot about Hyper-V and attending an IT Camp at Microsoft I really wanted to give the new SCCM 2012 a closer look and at the same time get better acquainted with Hyper-V and other related upcoming Microsoft releases such as Data protection Manager and Service Manager.

Getting all the installation files and pre-requisite software downloaded

Sign up and download all the installation files here: http://technet.microsoft.com/en-us/evalcenter/hh505660 (6.6GB) and in addition to this you will need all of the pre-requisite software which is listed here: http://technet.microsoft.com/en-us/library/hh751268.aspx  I went through a fair bit of trial and error to get the set-up utility to detect all of the installation files and I recommend making sure to extract each of the products into their own folders.  Don’t put all of the products in one folder or share folders as if the installer doesn’t recognize one of the paths/files you wont be able to tell which one (plus its messy and you might end up over writing files) I would also suggest you do the same for all of the pre-requisite software. (also don’t forget to extract all of the zip/exe/iso files as the unified installer wont read them otherwise.  I found winrar invaluable for this)


Preparing the installation environment and servers

To get all the products installed you need at least 8 servers (physical or virtual) with a minimum of 2GB of ram each.  I set all mine up on a single Hyper-V host as its only for testing purposes and I don’t have loads of servers spare for development/testing work.  I would also suggest using a sensible naming convention or it can get pretty confusing quite quickly and bare in mind that the server you choose to initially run the set-up on will become the Orchestrator server.

Aside from the base windows 2008 R2 operating system all the machines need to have a few things configured before they are ready for deployment.  To avoid duplication I made sure all of the servers were in a single OU and created a policy to apply the customizations for me rather than individually configuring the local policy on each host.

Computer Config \ Administrative Templates \ System \ Credentials Delegation \ Allow Delegating Fresh Credentials
Set to = Enabled
Server = WSMAN/*

Computer Config \ Administrative Templates \ System \ Credentials Delegation \ Allow Delegating Fresh Credentials with NTLM only server Authentication
Set to = Enabled
Server = WSMAN/*

Computer Config \ Administrative Templates \ Windows Components \ Windows Remote Management (WinRM) \ WinRM Client \ Allow CredSSP authentication
Set to = Enabled

Computer Config \ Administrative Templates \ Windows Components \ Windows Remote Management (WinRM) \ WinRM Client \ Trusted Hosts
Set to = Enabled
TrustedHostList = *

Computer Config \ Administrative Templates \ Windows Components \ Windows Remote Management (WinRM) \ WinRM Service \ Allow Automatic Configuration of listeners
Set to = Enabled
IPv4 filter = *
IPv6 filter = *

Computer Config \ Administrative Templates \ Windows Components \ Windows Remote Management (WinRM) \ WinRM Service \ Allow CredSSP authentication
Set to = Enabled 

Computer config \Administrative Templates \ Network \ Network Connection \ Windows firewall \ Standard Profile \ Windows firewall Protect all network connection
Set to =  disabled

I then went round each server and ran a gpupdate to ensure they all applied the new policy before I attempted to run the unified set-up.


Running the unified installer

On running the unified set-up and selecting the products you are evaluating (I wanted to try all of them) you are prompted to provide a path to each of the installation files you downloaded earlier.  (I bet you are glad you downloaded and extracted each of the products/pre-requisites into their own folders now) if all is well it should be a simple exercise of browsing and selecting each of the folder paths created earlier.  Dont be surprised if it doesnt recognize one of the paths or files just make sure you have the right product/version and its extracted, even the iso file for the windows automated installation kit needs to be extracted so its just a normal folder full of files.  (UNC or local path names are both OK.)


Once you have completed both this screen and the pre-requisites page that follows it you can select what account you wish to use as the installer account.  I created my own domain user for this but you can use any user account which has the required permissions.  Following this you can configure other options such as site name etc. and finally you are presented with an install button.  Sit back and watch the progress bars.