VMM Host not responding – WinRM Error and access is denied

If you have a Virtual Host in Virtual Machine Manager that is not responding, and forcing a manual refresh returns an error like this:

Error (2910)
VMM does not have appropriate permissions to access the resource C:\Windows\system32\qmgr.dll on the server.
Access is denied (0x80070005)

It can often be remedied by one of the following: Re-install the VMM agent, restart the virtual machine manager agent and WMI services or restart the virtual host.  It is also worth making sure your hosts are all up to date as well.

Occasionally I see a host where this doesn’t work and no matter what it, remains as “not responding” in VMM.  For me the case appears to be a broken winrm configuration.  You can be fooled into thinking winrm is setup correctly as a “winrm /quickconfig” returns as already setup, and the winrm service is running.

It looks like all the “winrm /quickconfig” command does is check that winrm has been enabled, it wont reset other possibly incorrect configurations or broken settings.

Comparing the winrm configuration and registry of a working identical host to a “not responding” host I have found the following commands will correct the deviated settings and usually results in a host that now responds to VMM.

reg add HKLM\SOFTWARE\Microsoft\Windows\CurrentVersion\Policies\System /v LocalAccountTokenFilterPolicy /t REG_DWORD /d 1 /f

winrm set winrm/config/service/auth @{CredSSP=”True”}
winrm set winrm/config/winrs @{AllowRemoteShellAccess=”True”}
winrm set winrm/config/winrs @{MaxMemoryPerShellMB=”2048″}
winrm set winrm/config/client @{TrustedHosts=”*”}
winrm set winrm/config/client/auth @{CredSSP=”True”}

Be sure to run these on the effected host in an admin command prompt.

Installing .NET 3.5 on Server 2012 and 2012 R2

.net 3.5 is still often required but the resources to install it are by default absent from the windows installation.  If you have internet connectivity this isn’t such an issue as the files are simply pulled down from microsoft but if you are performing an offline build or are in a dev/secure environment with no connectivity or heavily filtered it can be problematic.

Personally I find the fastest method is to mount/insert the 2012 installation media and install the feature with DISM.  Open an elevetates (run as admin) command window.

dism /online /enable-feature /featurename:NetFX3 /all /Source:d:\sources\sxs /LimitAccess

Simply change “d” to match the drive letter your install media is available at.

Dism install


If the GUI is more your sort of thing simply run the “Add roles and features” wizard and select the .NET 3.5

Click next and locate the “Specify and alternate source path” link at the bottom of the window.  Click this.


alternate source


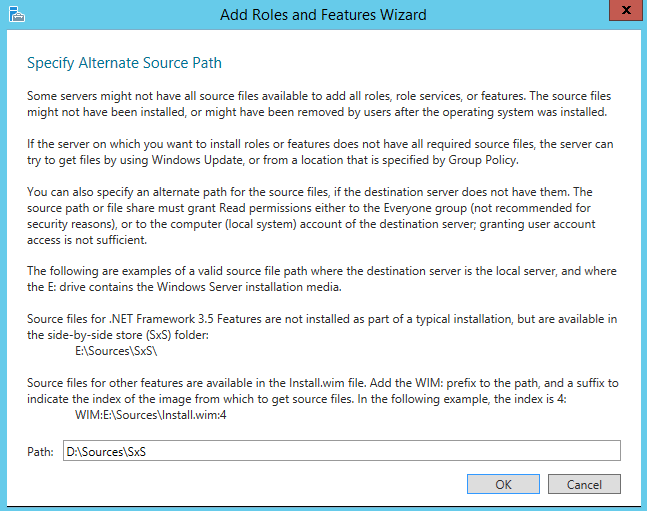
In the window that loads type in the path to your side-by-side folder on the installation media.

alternate source window


Click on OK and on Install to start .NET 3.5 installing.

Upgrading System Center Virtual Machine Manager 2012 SP1 to R2

The upgrade process is reasonably smooth but requires you to uninstall the SCVMM 2012 SP1 and any Hotfixes or update rollups that are in place.  You will also need to uninstall the 8.0 Microsoft ADK and install the latest 8.1 version before running setup from the Virtual Machine Manager 2012 R2 disk.  The 8.1 ADK can be found here: http://www.microsoft.com/en-gb/download/details.aspx?id=39982

Before starting gather and record the details of the existing implementation if not already documented.  For example the database server, instance name, database name and the details of the virtual machine manager service account.  You can view the current database configuration from within the VMM console.  While in the “Administration/Settings” view, click on “General” and then double click “Database Connection” While it is possible to use the local system service I would recommend creating a domain user for the service to run as with a local system service account baremetal hyper-v host deployments are not possible and you may have trouble logging in from other machines.

I would also make sure at least 10GB of free space is available on the VMM server as the 8.1 ADK is quite large.

  1. Uninstall both the VMM 2012 condole and management features. Make sure you select the option to retain the database.
  2. Take a backup of your SCVMM database.
  3. Uninstall the 8.0 ADK
  4. Install the 8.1 ADK – If you are using the online installer a large amount of data will need to be downloaded.  If this is not possible consider running the installer ahead of the upgrade and download the full install for later offline installation.
  5. Run setup from the VMM 2012 R2 disk
  6. Simply follow the wizard entering the database and service account details you recorded earlier
  7. Once setup is complete there are a few tasks left to complete: Any driver packs will need to be removed and re-added or they may not be discovered correctly.  Virtual Machine templates may need to be re-pointed to the correct operating system containing VHD.  You will also of course need to update the agents on all of your VMM managed hosts.